
Shared Calendars in Outlook
Shared calendars in Microsoft Outlook make it easy to share availability, schedules, and events with selected users. By setting customizable permissions, users can control exactly what others can view or manage within the calendar. This blog explains how to create shared calendars in Microsoft 365 for better coordination and efficient scheduling.
We’ve all experienced how a simple meeting request can turn into a long chain of messages, checking availability, resolving conflicts, and managing last-minute changes. What should take only seconds ends up consuming time and energy before the actual work even begins.
Shared calendars in Microsoft Outlook eliminate this friction. As calendars serve as the central place for managing meetings and commitments, when shared with others, they provide clear visibility into availability without constant back-and-forth communication.
In this blog, we will explore what shared calendars are in Outlook and how to create and manage them effectively.
Calendar sharing in Microsoft Outlook help improve collaboration by making it easy to share calendar access in a controlled and structured way. This allows users to share their calendars with specific users inside or outside the organization.
At its core, Outlook calendar sharing is identity-based. This means access isn’t a public link; it’s granted specifically to users’ email addresses. This ensures that only the intended users can view or manage the calendar, keeping the information secure.
To manage calendar access effectively, Outlook offers multiple permission levels that define what a user can view or modify within a shared calendar. Based on the requirement, appropriate permissions can be assigned to ensure controlled access and smooth collaboration.
- Can view when I’m busy
This is the most basic level of access. Users can only see whether you are free or busy during specific time slots, without any additional context. All events are displayed as “busy,” with no titles, locations, or descriptions visible. This calendar permission is ideal when you want to share availability for scheduling purposes while keeping all event details private. - Can view titles and locations
With this permission, users gain slightly more visibility. They can see the event title, time, and location, while all other details, such as attendees and notes, remain hidden. This level works well in scenarios like coordinating meetings or managing shared resources (e.g., conference rooms), where some context is helpful without exposing full event details. - Can view all details
This calendar permission provides complete visibility into your calendar. Users can view all event details, including descriptions, participants, and other metadata. However, they cannot make any changes. This is useful when stakeholders need full transparency without the risk of accidental edits. - Can edit
This permission allows users to actively manage your calendar. They can create, modify, and delete events, making it suitable when someone else is responsible for organizing or maintaining your schedule. This level of access is typically available only when sharing with users within your organization, as external users are generally restricted to read-only access. - Delegate
Delegate access offers the highest level of control. A delegate can fully manage your calendar on your behalf, including scheduling meetings, responding to invitations, and organizing events. Depending on the configuration, delegates may also be allowed to view private events and manage categories. This level of access is limited to internal users and is most used for executive assistants or team coordinators. Additionally, delegate permissions are typically supported only for default calendars.
Now that you understand what a shared calendar is and the level of control you have with permissions, it’s time to put that knowledge into action.
You can use the following methods to share a calendar in Microsoft Outlook.
To configure calendar sharing in Microsoft Outlook, follow the steps below.
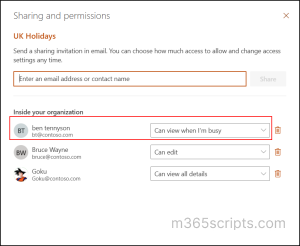
- Open Outlook Web or Outlook app and navigate to Calendar in the left section.
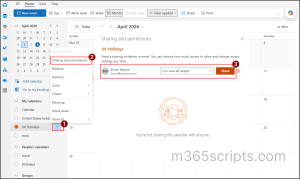
- Under My calendars, hover over the desired calendar, select ellipsis (…), and click Sharing and permissions.
- In the Sharing and permissions prompt, enter the email address of the user with whom you want to share the calendar.
- Select the required calendar permission level from the dropdown and click Share to grant calendar access to the respective user.
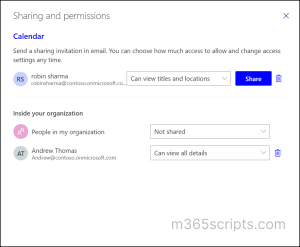
Note: By default, when you share your default calendar, the People in my organization entry is assigned the “Can view when I’m busy” permission. This allows everyone in your organization to view your availability.
If you want to share your calendar with only specific users, change the People in my organization permission to Not shared. Then, add the required users and assign the appropriate permission level. This allows only the selected users to access your shared calendar while blocking access for all other users in your organization.
Calendar sharing through the Outlook UI is typically a one-by-one process, where permissions must be assigned to each user individually. This can become time-consuming when managing multiple users.
PowerShell simplifies this process. By managing calendar permissions through PowerShell, you can share a calendar with multiple users at once. Follow the steps below to configure calendar sharing using PowerShell.
Connect to Exchange Online PowerShell and run the following cmdlet to create a shared calendar using PowerShell.
|
1 2 3 4 |
$users = @("<AccessUPN1>", "<AccessUPN2>") $users | ForEach-Object { Add-MailboxFolderPermission -Identity "<SourceUPN>:\Calendar\<CalendarName>" -User $_ -AccessRights <PermissionLevel> } | Format-Table FolderName, User, AccessRights |
Replace the following placeholders in the cmdlet with appropriate values:
- <SourceUPN> – The mailbox owner whose calendar is being shared.
- <CalendarName> – The name of the calendar you want to share. If you are sharing the default calendar, you can remove this from the path (<SourceUPN>:\Calendar).
- <AccessUPN1>, <AccessUPN2> – Users who need access to the calendar.
- <PermissionLevel> – The permission you want to assign to the users. You can include Editor, Author, Limited Details, Availability Only, etc.
Note: The cmdlet works only if your Outlook language is set to English. In other languages, the default calendar folder name may be different. Before running the cmdlet, check the correct calendar folder name using the following cmdlet.
|
1 |
(Get-MailboxFolderStatistics <SourceUPN> -FolderScope Calendar).Identity |
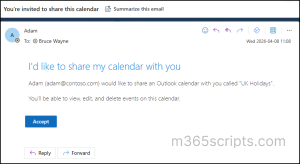
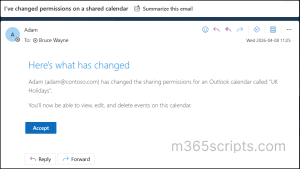
Once the calendar has been shared, it will not be added automatically to the recipient’s view. The user is required to accept the sharing invitation sent via email. Use the following steps to access and view the shared calendar in Microsoft Outlook.
- Open Outlook and locate the calendar sharing invitation in your inbox.
- Open the invitation email and select Accept to add the shared calendar to your Outlook.
- Then, click on View calendar or navigate to the Calendar section to access the shared Outlook calendar.
Over time, shared calendars tend to accumulate access that is no longer needed. Without visibility into who has access and at what level, managing permissions can become difficult. Auditing helps bring that clarity back.
Follow the below steps to view shared calendar permission in Microsoft 365.
- Open PowerShell and connect to the Exchange Online module with the following cmdlet.
1Connect-ExchangeOnline - Next, run the following cmdlet by replacing <UserPricipalName> with user principal name of the desired user.
1Get-MailboxFolderPermission -Identity <UserPrincipalName>:\Calendar | ft FolderName,User,AccessRights
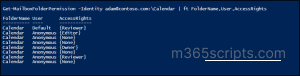
This cmdlet retrieves the current calendar permissions for the specified user, including the folder name, assigned users, and their access rights.
The above PowerShell cmdlet retrieves calendar permissions for only a single mailbox (calendar) at a time, which makes it less efficient when auditing across multiple users.
To overcome this, you can use a PowerShell script to retrieve all shared calendar permissions across your organization. This approach provides a consolidated view, including mailbox names, shared users, and their assigned access rights, making large-scale auditing more efficient and manageable
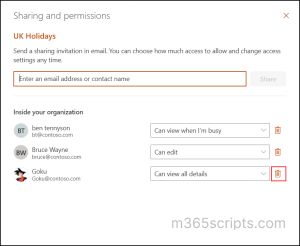
When a user’s role or responsibilities change, it may be necessary to update their calendar access level. Instead of removing and re-sharing, Outlook allows you to quickly update existing calendar permissions. Use the following steps to modify permissions for users who already have access to your calendar.
- Open the Calendar view in in Microsoft Outlook.
- Hover over the calendar you want to manage, click the ellipsis (…), and select Sharing and permissions.
- In the permissions panel, you can see the list of users who have access to the calendar along with their current access level.
Select the user and use the permission dropdown next to their name to update the calendar access level.
 Once updated, the shared user will be notified, and the updated permissions will reflect in their calendar once the invitation is accepted.
Maintaining accurate access is just as important as granting it. When a user no longer needs visibility into a shared calendar, their permissions should be removed promptly. You can remove calendar permissions for a user by following the steps below.
- In the Sharing and permissions settings for the desired calendar in Microsoft Outlook.
- Locate the user whose access you want to remove and click the delete icon next to their name.
The permission will be removed instantly, and the user will no longer have access to the shared calendar.
To remove calendar permissions in bulk, you can use the following PowerShell cmdlet by connecting to Exchange Online module.
|
1 2 3 4 |
$users = @("<AccessUPN>","<AccessUPN>") $users | ForEach-Object { Remove-MailboxFolderPermission -Identity "<SourceUPN>:\Calendar\<CalendarName>" -User $user -Confirm:$false } |
Replace the following placeholders in the cmdlet with appropriate values
- <SourceUPN> – The mailbox owner whose calendar is being shared.
- <CalendarName> – The name of the calendar you want to share. If you are sharing the default calendar, you can remove this from the path (<SourceUPN>:\Calendar).
- <AccessUPN1>, <AccessUPN2> – Users who access to the calendar need to be removed.
While shared calendars in Microsoft Outlook significantly improve collaboration, they also come with certain limitations that users and admins should be aware of.
- Users can view up to 30 calendars at a time. Exceeding this limit may cause errors and impact performance in Outlook.
- When multiple users access or update the same calendar simultaneously, changes may take time to sync, and heavy usage can lead to slow loading.
- Managing and assigning permissions at scale can be challenging. As user requirements change over time, it may lead to unnecessary or outdated access if not managed properly.
- Over-sharing calendar data can unintentionally expose schedules and work patterns, which could be misused for targeted attacks.
- If a user with shared calendar access is compromised, attackers could potentially view or modify calendar data, disrupting schedules or gaining insights into sensitive operations.
Apart from calendar sharing, Microsoft provides multiple methods to share calendar across users, groups, and external identities. Understanding these options helps in selecting the right method based on the required level of visibility and access.
Below is a comparison of the different calendar sharing methods available in Microsoft 365.
| Feature | Shared Calendars | Group Calendars (M365) | Published Calendars |
| Access Type | User-level (Directly within the Outlook client). | Group-level (Tied to M365 Group/Teams membership). | Web-based (HTML link) or Subscription-based (ICS). |
| Purpose | Sharing personal or custom calendars with specific users. | Centralized scheduling for a dedicated project team or group. | Providing a calendar schedule to a wide or public audience. |
| Permission Level | Granular: View Only, Can Edit, or Delegate Full Access | Role-based: Owners have full control; Members edit by default | Read-only: View-only access for all recipients |
| Permission to Share | Users can typically share their own calendar by default. | Requires admin rights to create the Group (usually restricted). | Users can publish unless blocked by external sharing settings or mailbox policies. |
| External Restrictions | Depends on tenant-wide external sharing settings in Entra ID/M365. | Requires “Guest Access” to be enabled for the specific Group. | None; accessible to anyone with the URL globally. |
| Sharing Management | Owners add or remove specific users/permissions at any time. | Managed by adding or removing members from the M365 Group. | Managed by publishing or unpublishing the calendar access in Microsoft 365. |
| Audience | Specific colleagues, managers, or external partners. | Internal project teams or departmental staff. | The general public, clients, or large external organizations. |
| How it is Shared | A sharing invitation is sent via email. | Automatic; appears in the sidebar when joined to a Group. | A URL/Link is generated and manually sent to the audience. |
| Example Scenario | An executive sharing their calendar with an assistant. | A DevOps team tracking sprint cycles and releases. | A company sharing a public holiday or events calendar. |
You don’t have permission to share your calendar with <UserPrincipalName>
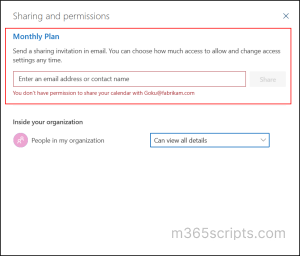
Reason: This error occurs in Microsoft Outlook when external calendar sharing is blocked due to tenant-level settings or mailbox sharing policies in Microsoft 365. It may also occur if the target user account is disabled in organization.
Solution: Ensure that external calendar sharing setting is enabled in the Microsoft 365 admin center. If the issue persists, check for any mailbox sharing policies in Exchange Online that may be restricting calendar sharing for the user, and update them accordingly.
Wrapping Up
Calendar sharing in Microsoft 365 enables teams to access calendars with the right level of visibility and control. Understanding how shared calendars work and managing permissions effectively helps ensure smooth coordination, reduced dependency, and continuity when updates are required.
We hope this blog has given you a clear understanding of how create and manage shared calendars in Microsoft 365. Feel free to reach out through the comments section if you have any questions or need further assistance.


