How to Disable Nesting for Security Groups in Entra ID
Security groups rarely stay simple as an organization grows. One group may contain another group, which can contain yet another. As nesting grows, it becomes harder to keep track of group relationships and manage permissions.
Microsoft Entra ID now provides a new property named disableNesting, which allows administrators to prevent a security group from being nested within another group. This gives administrators greater control over how group memberships are structured.
Let’s take a closer look at the disableNesting property and how it can be used to control group nesting
In Microsoft Entra ID, group nesting happens when one security group is added as a member of another security group. The group that is added becomes the child group, while the group that contains it becomes the parent group.
This helps administrators to reuse existing security groups when assigning access. For example, department or role-based groups can be nested under a parent group that provides shared access without recreating their memberships.
Group nesting works differently depending on the group types involved. The following table shows which group types support nesting and which combinations are not supported:
| Parent Group | Child Group | Nesting Supported |
| Security Group | Security Group | ✅ Supported |
| Distribution Group | Distribution Group | ✅ Supported* |
| Microsoft 365 Group | Microsoft 365 Group | ❌ Not Supported |
| Microsoft 365 Group | Security Group | ❌ Not Supported |
| Security Group | Microsoft 365 Group | ❌ Not Supported |
*Distribution groups are created and managed in Exchange Online, not Entra ID, so their nesting is configured there, not through Entra ID’s “Group memberships” feature.
Nested groups can become difficult to manage as group relationships grow. Multiple layers of membership can make it harder to trace how users receive access and understand the impact of group changes.
Some Common challenges with nested groups include:
- Difficulty determining why a user has access to a particular resource through nested memberships.
- Cascading changes where modifying one group affects users through nested memberships.
- Complex group hierarchies make it harder to identify nested group relationships and conduct access reviews for role-assignable and privileged access groups.
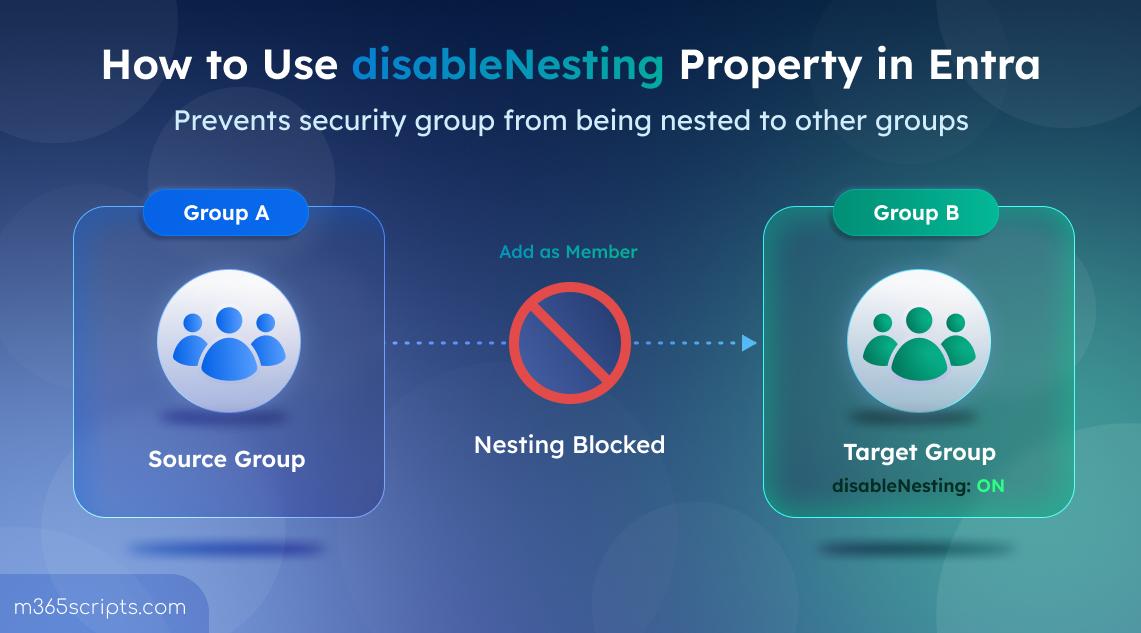
Microsoft Entra ID provides the disableNesting property to determine whether a security group can participate in group nesting.
When a security group is created with disableNesting set to true, the group cannot be added to another security group, and other security groups cannot be added to it. This gives administrators a way to keep selected groups outside nested group structures.
Before using this property, keep the following points in mind
- Disabled by default: disableNesting is false by default. Groups created without explicitly enabling it continue to allow nesting.
- Configured only at creation: The property can be set when the group is created, but it cannot be changed later with Update-MgGroup. An attempt to update it after creation returns a 400 error. Therefore, plan which groups need this restriction before creating them.
- Security groups only, for now. Microsoft 365 groups, distribution lists, and mail-enabled security groups don’t support this property.
Since disableNesting must be configured when the group is created, let’s see how to create a security group with this property enabled.
Administrators can configure disableNesting through Microsoft Graph PowerShell or the Microsoft Graph API. There is currently no native option in the Microsoft Entra admin center to configure this property.
First, connect to Microsoft Graph with the least-privilege permission required to manage the disableNesting property:
|
1 |
Connect-MgGraph -Scopes "Group-NestingSupport.ReadWrite.All" |
Once connected, create the security group with disableNesting enabled. Replace <GroupName> and <MailNickname> with your values:
|
1 2 3 4 5 6 7 8 |
$params = @{ displayName = "<GroupName>" mailEnabled = $false mailNickname = "<MailNickname>" securityEnabled = $true disableNesting = $true } New-MgGroup -BodyParameter $params |
Once the cmdlet is executed, a new security group will be created with group nesting disabled. This group cannot be added to other security groups, nor can other groups be added to it.
The above method works well when you need to create a single security group. However, creating multiple groups this way can take more time because you need to run the cmdlet for each group.
To create multiple security groups with group nesting disabled, create a CSV file containing the group names and mail nicknames, as shown below.
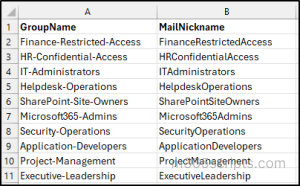
Replace <FilePath> with the path to your CSV file, then run the following PowerShell script:
|
1 2 3 4 5 6 7 8 9 |
Import-Csv "<FilePath>" | ForEach-Object { New-MgGroup -BodyParameter @{ displayName = $_.GroupName mailEnabled = $false mailNickname = $_.MailNickname securityEnabled = $true disableNesting = $true } } |
The script reads each row from the CSV file and creates a security group with disableNesting enabled. This is useful when the same nesting restriction needs to be applied consistently across multiple groups.
After creating the security groups, you can use Microsoft Graph PowerShell to identify all security groups with disableNesting enabled and export the results to a CSV file.
Get-MgGroup doesn’t reliably return disableNesting even when requested via -Property, since it’s not part of the cmdlet’s typed property set. Use a direct Graph request instead:
|
1 2 3 4 5 |
$response = Invoke-MgGraphRequest -Method GET ` -Uri "https://graph.microsoft.com/v1.0/groups?`$filter=securityEnabled eq true and mailEnabled eq false and disableNesting eq true&`$select=id,displayName,disableNesting" $response.value | Select-Object Id, DisplayName, DisableNesting | Export-Csv "C:\Temp\GroupsWithNestingDisabled.csv" -NoTypeInformation |
The command filters for security groups where disableNesting is set to true, retrieves their names and IDs, and exports the results to a CSV file.
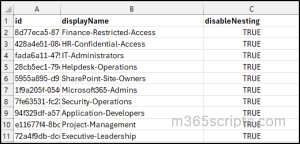
Note: The query uses the Microsoft Graph /groups endpoint directly so that the disableNesting value is included in the exported results.
Now that the security groups have been created, let’s verify whether disableNesting is working as expected.
Test 1 (Entra admin center): Try adding the security group with disableNesting enabled as a member of another security group.
Test 2 (Entra admin center): Next, try adding another security group as a member of the nesting disabled group.
Both operations will fail with the following error in the Microsoft Entra admin center:
Failed to add group member. Unable to connect to service connection error. Please try again later.
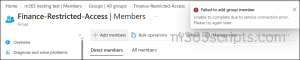
Test 3 (Microsoft Graph PowerShell): You can also verify the restriction using Microsoft Graph PowerShell. Use the following cmdlet to attempt to add one security group to another:
|
1 |
New-MgGroupMember -GroupId <TargetGroupId> -DirectoryObjectId <NewGroupId> |
Here, -GroupId is the group you’re adding a member into, and -DirectoryObjectId is the group being added as that member. Place the nesting disabled group in either slot to test both directions, the operation fails either way, with:
Cannot add group ‘<id>’ as a member to group ‘<id>’ because nesting is disabled on one or both groups.
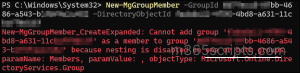
Together, these three tests confirm that disableNesting blocks the security group from participating in nested group relationships, whether attempted through the Entra admin center or PowerShell.
Build Groups With Nesting in Mind
Most nesting problems start with no decision at all—a group gets added to another to save time, and nobody remembers why a year later. The disableNesting property gives administrators a way to prevent that, but only when the group is created.
Since the setting can’t be changed later, decide whether a group should participate in nesting before creating it, particularly for sensitive or privileged groups.
If you have any questions or need clarification, feel free to reach out in the comments.