Automatically Move External Tagged Emails to a Folder Using Outlook Inbox Rules
External emails can quickly pile up in your Outlook inbox, making it difficult to distinguish messages received from outside your organization from regular internal emails. With the “External” condition in inbox rules, you can now automatically move external emails to a specific folder for easier mail organization.
Emails from customers, vendors, partners, and other external contacts are a common part of business communication. However, they can also introduce security risks when users cannot easily distinguish them from internal messages. To address this, Microsoft 365 provides the External email tag in Outlook, which helps users recognize messages received from outside their organization.
With the recent update to use the External tag as a condition in Outlook inbox Rules, users can now automatically move external tagged emails to a separate folder in Outlook. This makes it easier to keep external messages organized and maintain a focused inbox. In this blog, you’ll learn how the External tag in Outlook remove keeps external messages organized and maintain a focused inbox.
Email authentication methods such as SPF, DKIM, and DMARC help verify the authenticity of emails and protect organizations from spoofing. However, phishing and impersonation attacks can still reach users through legitimate external domains or compromised accounts.
As an additional layer of awareness, Outlook uses the External email tag to identify messages sent by people or organizations outside your company. For example, if contoso.com is your organization’s domain and an email arrives from [email protected], Outlook can display the External tag next to the message. This helps users recognize external messages and stay alert to potential security risks. Since many legitimate messages also come from customers, vendors, and partners, users can use Outlook inbox rules to organize external mails while applying exclusions when needed.
Instead of manually routing external emails, users can automatically move them to a dedicated folder using an Outlook inbox rule. This gives users more control over how they handle messages received from outside the organization.
Here are some common reasons to create an Outlook rule to move external emails,
- Keep the Inbox Focused on Internal Communication – Users who primarily work with internal teams can move external emails in Outlook to a separate folder and keep their main inbox focused on internal conversations.
- Reduce Inbox Clutter – Automatically moving external emails keeps customer, vendor, and partner messages out of the inbox, helping users avoid distractions from non-internal conversations.
- Create a Dedicated Review Area – A separate folder provides a convenient place to review and follow up on external messages.
- Phishing & Security Awareness – Keeping external emails separate can remind users to be more cautious when opening links, attachments, or other content received from outside the organization.
Before creating a rule to move external emails to a folder in Outlook, you must enable External email tagging for your organization. Microsoft 365 provides the Set-ExternalInOutlook PowerShell cmdlet to configure external email identification in Exchange Online.
Once enabled,
- Applicable external emails can display the External tag in in the subject line in supported Outlook clients.
- The External tag condition is available by default in Outlook inbox rules, allowing users to create rules based on messages identified as external.
Note: After enabling external sender identification, it may take 24 to 48 hours for the External tag to appear on emails from external senders in supported Outlook versions.
If your organization regularly receives messages from trusted external partners, you may want to handle them differently from other external emails.
Exchange Online provides an AllowList for external sender identification, which lets admins exclude specific email addresses or domains from receiving the native External tag.
Messages from those senders or domains won’t receive the native External tag in supported Outlook clients.
Warning: If you’ve already configured external email identification through a mail flow or transport rule, disable that rule before enabling native external sender identification. This prevents the external indicator from being applied twice and avoids duplicate subject prefixes.
Before creating a rule and moving an external email to a folder in Outlook, create a dedicated folder where Outlook can automatically place incoming external emails.
Step-1: Open your Outlook web or desktop version.
Step-2: In the left-side folder pane, right-click on the email address.
Step-3: Select Create new folder and enter a name for the folder such as External Emails.
Step-4: Press Enter to create the folder.
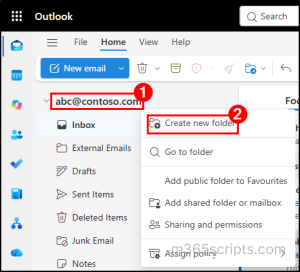
You can also use PowerShell cmdlets to create a folder on Microsoft Outlook.
Once you create the folder, configure an Outlook inbox rule to move external emails there automatically.
Outlook inbox rules allow users to automatically perform actions on incoming emails based on defined conditions. The “External” condition can be used to identify messages marked with the External tag.
To automatically move external emails in Outlook, follow these steps.
- Open Outlook and head to the Settings page.
- Navigate to Email → Rules.
- Click Add rule and enter a name for the rule, such as External Emails.
- From a Add a condition dropdown, choose the condition as External under ‘Marked with’ condition.
- From a Add an action dropdown, choose ‘Move to’ option from ‘Organize’ action.
- Select the External Emails folder created earlier.
- Under Add an exception, select any conditions you want to exclude from the rule.
- Review the rule settings and click Save.
Note: You can enable Stop processing more rules to prevent other rules from being applied to a message after this rule is matched. The Run rule now option can be used to apply the rule to existing messages that meet its conditions.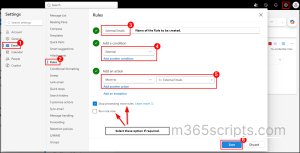 The resulting rule can be represented as,
When an email is received
↓
If the email is marked External
↓
Move it to the External Emails folder
This allows Outlook to automatically process qualifying external emails as they arrive. It also gives users greater control over how they organize external messages.
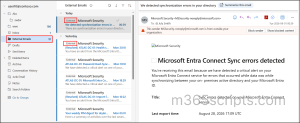
As shown above, emails marked with the External tag are automatically moved to the designated folder. This keeps them separate from other messages in the inbox.
Instead of applying the same action to every external email, users can combine the External tag with other rule conditions for more targeted workflows.
For example, users can combine the External tag with conditions related to the sender, recipient, importance, or attachments to handle different types of external messages separately.
This approach is particularly useful for users who receive a high volume of external communication. By combining the External email condition with other inbox rule conditions, users can create rules based on the message type and context. This allows them to handle external emails differently based on specific criteria.
Some practical examples include:
- External emails with attachments can be moved to a separate folder for easier review of documents received from outside the organization.
- External emails marked as high-importance can be flagged or moved to a priority folder for quicker review.
- External emails from a specific domain can be routed to a dedicated folder when a team regularly receives messages from a particular external organization. For example, support teams can automatically move emails from a customer’s domain to a dedicated folder for easier query management.
- External emails from known spam domains can be automatically deleted. This helps prevent unwanted messages from cluttering the inbox without affecting legitimate external emails.
Once the rule is created, you can manage it from Settings → Email → Rules. Select the External Emails rule to,
- Temporarily disable or enable the rule
- Edit the rule’s conditions
- Modify its actions
- Configure exceptions
- Change the destination folder
- Delete the rule permanently
Disable the rule to temporarily stop automatically moving external emails. You can also delete the rule when you no longer need it. This permanently removes the rule and stops its associated action.
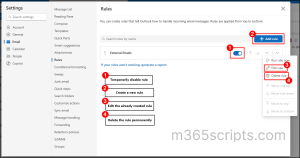
Admins can also manage inbox rules using PowerShell to configure rule conditions, actions, and exceptions programmatically.
Here are a few common questions about using the External tag with Outlook inbox rules to organize external emails.
1. Can I exclude specific external senders or domains?
Yes, you can configure exceptions in the Outlook inbox rule where supported. At the organization level, admins can use the ExternalInOutlook AllowList to exclude specific external senders or domains from the external indicator.
2. Can I move external emails from a folder back to the inbox automatically?
Yes. However, changing or deleting the existing rule will not move emails already moved to the External Emails folder. The rule only controls how Outlook processes matching incoming messages.To move these emails back to the Inbox, right-click the folder and select Move. Then, choose the inbox folder.
3. Why doesn’t Outlook move my external email to the specified folder?
In some cases, certain external emails may remain in the inbox even when the External tag is enabled. This may occur even when users configure the Outlook inbox rule correctly. The issue may be related to Microsoft 365-side processing or an intermittent service issue. Microsoft currently does not provide specific troubleshooting guidance for this scenario.
4. Can I use PowerShell to create a rule that moves External tagged emails to a separate folder?
No, users can currently configure the External tag-based folder rule through the Outlook UI. Microsoft does not provide a documented PowerShell option to create a rule using the External tag as a condition.
5. Does the External tag mean the sender is unsafe?
No, the External tag in Outlook indicates that the message originated outside your organization. External emails can be legitimate, but they can also contain spam, phishing attempts, or other malicious content. Therefore, the tag helps users identify external messages and encourages caution before clicking links, opening attachments, or sharing sensitive information.
Closing Lines
The External tag makes it easier for Microsoft 365 users to recognize emails originating outside their organization. Additionally, users can now use the tag as an Outlook inbox rule condition to organize external messages automatically.
By creating an Outlook rule to move external emails to a specific folder, users can reduce manual sorting. As a result, they can keep the inbox organized while maintaining visibility of messages received from outside the organization.
Thank you for sparing your time in reading this blog. If you have any queries, kindly reach out to us through the comments section.