Manage Inbox Rules in Outlook Using PowerShell
Exchange Online Inbox rules are a set of specific conditions that organize, filter, and forward email messages in Outlook. While Outlook offers a user-friendly interface, admins often look for efficient ways to manage inbox rules for large-scale deployments. In that scenario, PowerShell emerges as a powerful solution in offering automation and scalability to manage inbox rules in Outlook.
In this blog, we’ll explore how to manage Exchange Online Inbox rules using PowerShell. We’ll cover various use cases and PS cmdlet executions to empower you in efficiently handling inbox rules (mailbox rules).
As said earlier, inbox rules are a set of automated actions that users can configure to organize emails. These rules empower users to establish conditions for actions, including automatic moving, blocking, redirecting, and forwarding of emails upon delivery.
Inbox rules are further classified into two categories: server-side rules and client-side rules. Server-side rules are executed on the server before the email reaches the recipient’s inbox. Client-side rules are processed by the Outlook desktop client after the mail is received.
Tip:
Creating inbox rules by users may also lead to suspicious forwarding of sensitive data. Admins can require users to request for doing such high risk actions with justification by implementing privileged access management in Microsoft 365.
Let’s delve into exploring the management of server-side inbox rules through Exchange Online PowerShell.
Below is a list of possible operations that can be used to manage inbox rules in Outlook efficiently using PowerShell. Before proceeding with any of the operations listed here, make sure to connect to the Exchange Online PowerShell module.
- Create a mailbox rule
- Get inbox rule details
- Get inbox rules for all users
- Enable or disable inbox rules
- Modify inbox rules
- Remove inbox rules
- Remove all inbox rules
Using the ‘New-InboxRule’ cmdlet, you can create various inbox rules for a user’s mailbox. Below are some examples of inbox rule creations.
Forward Incoming Emails to Another Mailbox:
The following PowerShell cmdlet with the appropriate placeholders can be used to forward all the mails from one mailbox to another.
|
1 |
New-InboxRule -Mailbox "<User's UPN>" -Name "<Rule Name>" -From "<From Address>" -ForwardTo "<Address to which mails should be forwarded>" |

M365 admin can use the prebuilt PowerShell script that generates 3 types of reports to export Microsoft 365 mailbox forwarding emails. When a user configures a mail risky forwarding rule and forgets to disable it after use, it poses security issues. In such cases, it’s fine to remove the respective inbox rules.
Move Messages into a Folder:
The forthcoming cmdlet with appropriate values will create an inbox rule that moves the incoming emails to the junk email folder if the message body contains the word “Offer”.
|
1 |
New-InboxRule -Mailbox "<User's UPN>" -Name "<Rule Name>" -BodyContainsWords "Offer" -MoveToFolder "<User's UPN>:\Junk Email" |

Note: As an admin, you will get the following error when you configure the above rule for another user’s folder unless you have delegated access to that user’s mailbox.
“Microsoft.Exchange.Data.Storage.ConnectionFailedTransientException|Cannot open mailbox”.
The mailbox user can access and configure this rule themselves via PowerShell.
Mark Emails as Read:
The following cmdlet creates a rule that will mark the messages as read which are sent to the specified distribution list in the user’s mailbox.
|
1 |
New-InboxRule -Mailbox "<User's UPN>" -Name "<Rule Name>" -SentTo "<Distribution List’s UPN>" -MarkAsRead $true |

The examples provided above are just illustrations of mailbox rules. You can use a variety of attributes in a single rule to create your desired rule.
Points to Remember:
- More than one rule can’t be enforced for an incoming email if the configured rules conflict with each other.
- Users can create rules that mark emails as read, delete emails, or move emails based on specific criteria. However, it may unintentionally filter out important communications.
To retrieve a list of mailbox rules configured for a user in Microsoft 365, just execute the ‘Get-InboxRule’ cmdlet with the user’s UPN.
This execution displays the rule name, enabled state, priority, and rule ID of all inbox rules configured in the respective user’s mailbox.
|
1 |
Get-InboxRule -Mailbox "<User’sUPN>" |

To find all inbox rules of a given user, including any hidden rules, use the following cmdlet format.
|
1 |
Get-InboxRule -Mailbox "<User’sUPN>" -IncludeHidden |
To view the name, identity, and detailed description of all inbox rules within a user mailbox, use the forthcoming cmdlet.
|
1 |
Get-InboxRule –Mailbox "<User’sUPN>" | Select-Object Name, Identity, Description | Format-List |
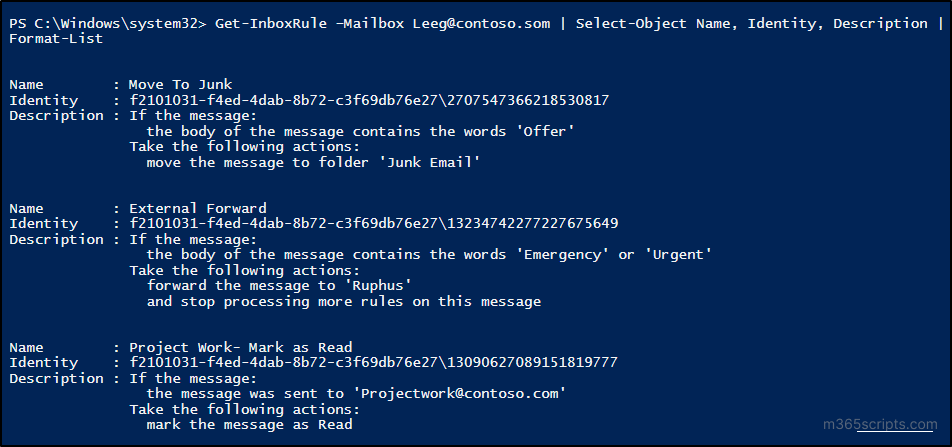
To view all details regarding an inbox rule for a user’s mailbox, use the following cmdlet with the rule name or ID.
|
1 |
Get-InboxRule –Mailbox "<User’s UPN>" -Identity "<Rule Identity/Rule Name>" | Select-Object * |
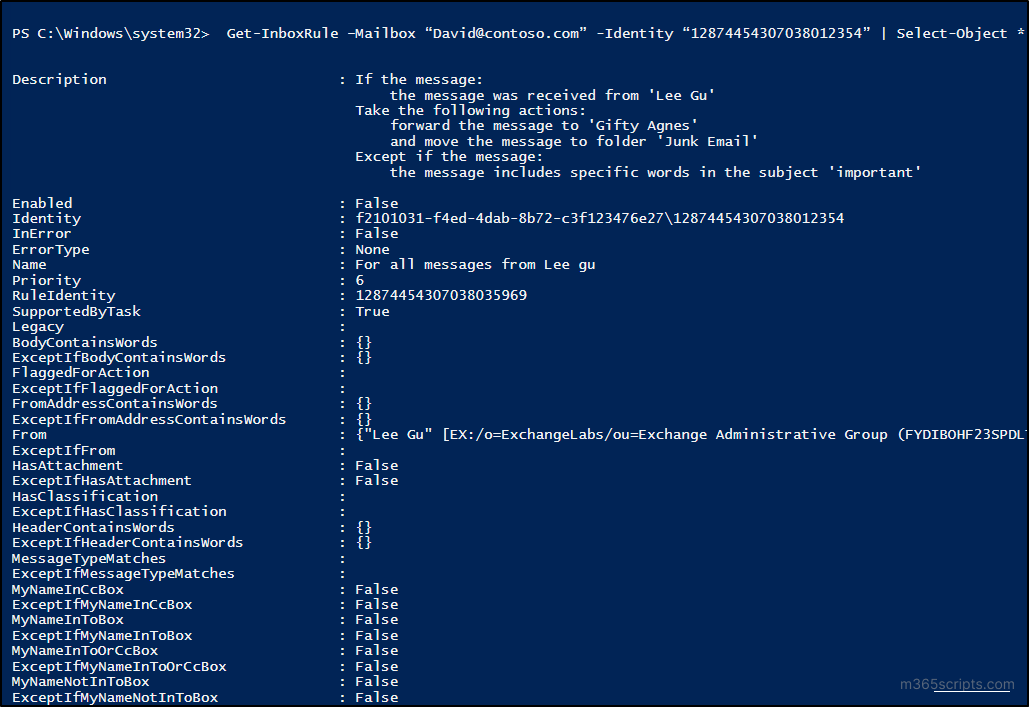
Note: In the above cmdlet, it would be better to use the rule ID instead of the rule name. Using the rule name can cause an error if it matches multiple entries.
To list the inbox rules configured for all users in your Microsoft 365 tenant, execute the following cmdlet as described.
|
1 2 3 4 5 6 |
Get-Mailbox -ResultSize Unlimited | ForEach-Object { $userUPN = $_.UserPrincipalName Get-InboxRule -Mailbox $_.Identity | ForEach-Object { $_ | Select-Object @{Name='UserUPN';Expression={$userUPN}}, Name, Identity, Description | Format-List } } |
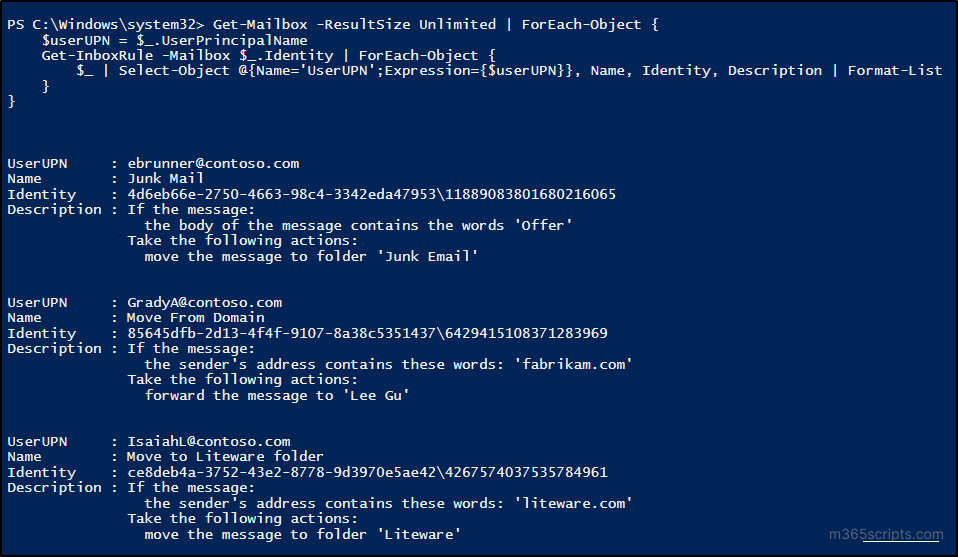
If any configured mailbox rule is causing issues or needs to be suspended, you can disable it and then re-enable it again later. To disable the inbox rule using Exchange Online PowerShell, use the ‘Disable-InboxRule’ cmdlet.
|
1 |
Disable-InboxRule –Mailbox "<User's UPN>" -Identity "<Rule Identity/Rule Name>" |
To enable any disabled rule, use the ‘Enable-InboxRule’ cmdlet.
|
1 |
Enable-InboxRule –Mailbox "<User's UPN>" -Identity "<Rule Identity/Rule Name>" |
Note:
If you don’t want your Outlook users to utilize inbox rule feature, you can disable it by configuring Outlook Web App policies using Exchange Online admin center or PowerShell.
The ‘Set-InboxRule’ cmdlet allows you to modify an existing inbox rule. If you want to update existing inbox rules, first retrieve the rule using the ‘Get-InboxRule’ cmdlet, then modify it.
Sample Execution:
|
1 |
Set-InboxRule -Mailbox "[email protected]" -Identity "12946511901075963905" -From "[email protected]" -ForwardTo "[email protected]" -StopProcessingRules $true -ExceptIfBodyContainsWords "Personal", "Privacy" |
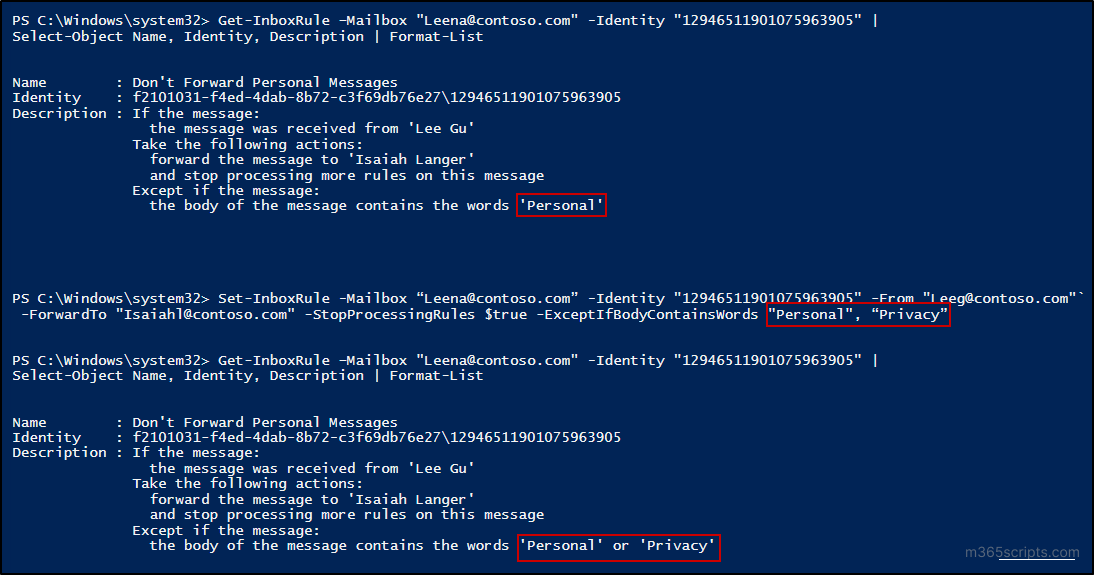
Executing the above cmdlet will update Leena‘s inbox rule. This modification ensures that all incoming emails, except those containing the words “Personal” or “Privacy” in the message body, will be forwarded to Isaiah’s inbox. Previously, all emails were forwarded to Isaiah’s inbox, except those with the word “Personal” in the message body.
Like the above example, you can update inbox rules in PowerShell using the list of available attributes. With these capabilities, administrators can proactively manage and adapt mailbox rules to align with organizational needs.
Just like how we create inbox rules, we can also delete inbox rules in Exchange Online. To do so, the ‘Remove-InboxRule’ cmdlet helps.
|
1 |
Remove-InboxRule –Mailbox "<User's UPN>" -Identity "<Rule Identity/Rule Name>" |
Removing the unwanted inbox rule can be helpful to efficiently declutter and simplify mailbox rule configuration.
To remove all the inbox rules configured in a user mailbox, use the following cmdlet with the user’s UPN.
|
1 |
Get-InboxRule -Mailbox "<User's UPN>" | Remove-InboxRule |
To remove all the inbox rules including hidden rules, use this cmdlet.
|
1 |
Get-InboxRule -Mailbox "<User's UPN>" -IncludeHidden | Remove-InboxRule |
In this blog, we’ve explored the process to manage inbox rules in Outlook using PowerShell. By incorporating these PowerShell cmdlets, you can streamline a more productive and manageable Exchange Online environment. Feel free to leave your queries for further assistance.

