Auto Accept Meeting Invitations in Outlook – The Smart Way to Schedule
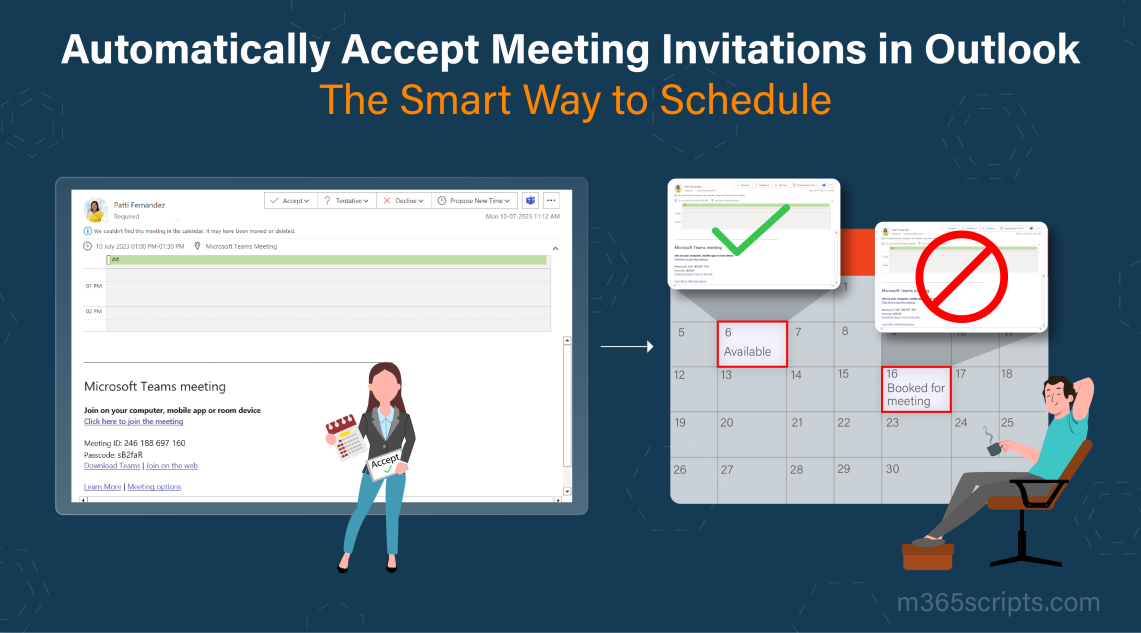
Configure automatic acceptance of meeting invitations in Outlook to eliminate manual calendar analysis. Enable auto accept or decline based on availability to provide instant responses to meeting organizers. Reduce time switching between email and calendar while maintaining aligned meeting schedules.
Teams’ meetings are essential in this hybrid environment, enabling seamless connectivity, collaboration, and productivity within Office 365. You can effortlessly send or receive meeting requests to anyone, transcending geographical borders! 🌐 If required, you can also customize meeting invites in Microsoft Teams to share unique invites. Yet, the current procedure requires you to manually open the email and cross-reference your calendar to determine availability before accepting the meeting invitation.
However, it’s a daunting task, sparing you the headache of manual analysis! 😩 Then, imagine having a virtual assistant at your beck and call, ready to accept meetings automatically on your behalf. Were you expecting one? That’s where the “automatic accept or decline meeting invites” feature springs into action!
Microsoft enables you to auto accept meeting invitations in Outlook, so you don’t have to analyze your free time and decide whether to accept meetings on your own!
Overall, this frees you to focus on the important stuff while effortlessly managing your calendar. So now, let’s learn how to automatically accept meeting requests in Microsoft Outlook.
1. Reduced switching between email & calendar: Instead of jumping back & forth between calendar and email for accepting invitation, this automatically accepts or rejects emails without affecting your existing meeting. Minimize distractions and focus on what matters most!
2. Instant response: Rather than making the inviter wait for your decision, it will send an immediate response, such as a meeting accepted or denied, without any time-consuming analysis. Eliminate waiting time & respond instantly to meeting requests! 🕛
3. Align meetings: By swiftly responding and examining your schedule, it will help the meeting organizer to know the user’s availability thereby picking up some other time slot for important meetings. Enable Organizers to align meetings for effective collaboration! 🤝
4. Avoid scheduling conflicts: Sometimes, you may receive multiple meeting invitations for the same time slot, which leads to meeting clashes. But this setting will eliminate such conflicts by properly analyzing your availability and managing meeting requests without effort. Clashes-free meeting schedules in Microsoft Outlook! 🙂
As we are done with the benefits of the setting, let’s move to the steps on how to automatically accept calendar invites in Outlook.
Instead of manually accepting or rejecting meetings, Microsoft has given you the ability to automatically assess your availability and respond to meeting invitations on your behalf.
To do so, you can make use of the auto accept/decline Outlook invitation setting by following the steps below.
Note: Before entering the steps, note that the “Automatic accept or decline meeting invitations” is available only for Outlook desktop and is not supported by Mac and Outlook web (OWA).
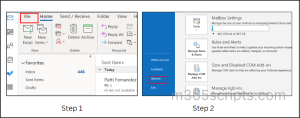
Step 1: First, open the Outlook client and click the File at the top left corner.
Step 2: Then, click Options from the side bar.
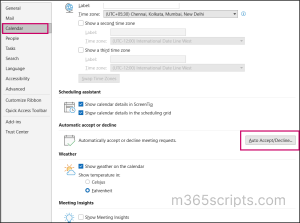
Step 3: Now, select the Calendar option and scroll down the page, until you reach the Automatic accept or decline section and then click on the Auto accept/decline… option.
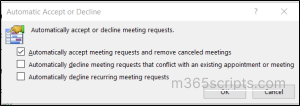
Step 4: On selecting the Automatically accept meeting requests and remove canceled meetings, you can make use of the above two options based on your requirement.
Note: If you don’t need this, you can turn off auto accept or decline calendar invites setting in Outlook anytime.
Three ways of Responding to Meeting Invitations in Outlook
The “automatically accept or decline meeting request” setting gives you the three options to configure your response to meeting requests in Outlook. They are,
1. Automatically Accept Meeting Requests and Remove Canceled Meetings – Enabling this option will auto accept meeting requests and add the accepted ones directly to the calendar. Likewise, once the meeting gets canceled due to issues, it will automatically remove them from your calendar.
Point to Remember: Before enabling this option of automatic acceptance of calendar invites, make sure to plan your work hours in Microsoft Outlook properly. If not, Outlook then considers it as an “Available” time slot, accepting all meeting requests.
2. Decline Conflict Meetings Automatically- Enabling this option will automatically decline any meeting invitations that conflict with existing meetings in your schedule.
3. Automatically Decline Recurring Meeting Requests – This setting will decline a meeting request that are scheduled to occur on a regular basis. Overall, this helps to align your schedule for important meetings in Microsoft Teams based on your availability.
Step 5: Click OK given in the Auto accept/decline page.
Step 6: Finally, to save the configuration, click OK at the bottom.
Once done, Outlook will send automatic responses to meeting requests in Calendar, ensuring proper schedule management without any conflicts in Outlook calendar.
Think of a case where one of your employees schedules a meeting invitation for the time slot of 8 PM to 8:30 PM, which falls out of your regular working hours. Despite being out of the office, you would respond promptly to the sender.
So, here, you can set auto-respond to the meeting invitation that reaches your inbox after your working hour schedule. To send such auto responses, you need to create a rule in your Outlook desktop.
How does the Outlook Rule Work?
When any meeting request is received outside your office hours, the rule will automatically send a predefined message to the inviter. Thereby, you can lessen your manual intervention in responding to meeting requests outside the office schedule.
Before getting into the steps to create a rule that auto-responds to meeting invitations in Outlook, make sure to create an email message template. Importantly, don’t miss conveying your availability in the Outlook template (Ex: I will not be able to attend meetings after 7 PM). Additionally, you can suggest alternative meeting slots within your working hours in the template.
Now, let us get into the step-by-step process of creating a rule to set up automatic email replies for meeting inviters.
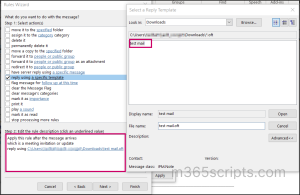
Outlook client → Home → Rules → Manage Rules & Alerts → New Rule → Apply rule on messages I receive → Next → which is a meeting invitation or update → Next → reply using a specific template → Look In → User Templated in File system → Browse → select your customized template → Next → Finish.
Note: This automated response will be sent to the person who invited you only upon receiving their initial request.
If you have faced irrelevant meetings with a specific person in the past, you can automatically decline meetings with them. This will save you time, rather than involving yourself in unnecessary meetings, and makes you focus on prime tasks.
To make Outlook decline meeting from a specific person automatically, create a rule in old Outlook by following the steps below.
- First, create an email message template with a message that you want to send for declining the meeting.
- Now, navigate to Outlook client → File → Manage Rules & Alerts → New Rule.
- Then, select the Apply rule on messages I receive and click Next.
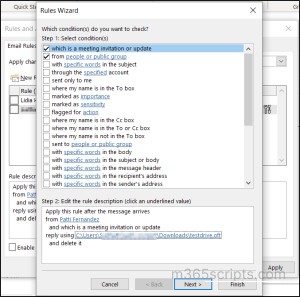
- Now, select the from people or public group condition and add the respective username of the individual you want to block in the rule description part below and click Ok.
- In the same dialogue box (Rules Wizard), scroll to select the Which is a meeting invitation or update option.
- Now, click Next and select the reply using a specific template option.
- And then click the text link a specific template → Look in (drop down box) → User Templates in Files System →Browse → select your customized template> Ok
- Then, go back to the Rules Wizard and select delete it option.
- Click Next until you reach the last dialog box.
- Now, specify the name for the rule and click the Turn on this rule option.
- Finally, review the rule and click Finish.
Also, you can auto-accept meeting invites from specific persons using VBA (Visual Basic for Applications) code. Upon configuring the code with the “sender name,” Outlook will automatically accept meeting requests sent from the person you specified in the code.
1. The “Automatically decline meeting that conflicts with an existing appointment or meeting” can’t be configured alone. It gets greyed out and get enabled only after clicking the “Automatically accept meeting and decline meeting requests?
Answer: Yes, that’s true. To auto decline conflicting invitations, you need to enable the first option. Suppose if you don’t want to accept all the meeting invitations, you ought to manually decline such requests. For conflicting meeting requests, the outlook will notify you like,
This appointment conflicts with another one in your calendar.

From the above options, you can accept or reject invites to meetings manually.
2.
Where is Auto Accept Meeting Invites on Mac?
Answer: The auto accept meeting invites are not available for Mac, it is available only for Windows versions of Outlook.
3. Is Calendar automatic accept meeting invites setting will not work when Outlook is closed?
Answer: Yes, it will not function when Outlook is closed. But once got opened, it will respond to the invitation received by checking your availability.
In short, the setting the “Automatically accept/decline meeting requests” setting provides a convenient solution that saves you time and allows you to focus on your important tasks. This will reduce the hassle of manually accepting or denying meeting requests!
No more tedious or double-check requirements to accept/reject a meeting request!
In addition to managing meeting invitations, it is equally important to monitor the participants of a meeting. While the Microsoft Teams attendance report provides some information about meeting participants, not many details are revealed here! Therefore, it’s better to audit Teams meetings using PowerShell as it offers comprehensive information about meeting participants, meeting details, and more of all our needs. By implementing these measures, you can ensure a smoother workflow, promote seamless collaboration, and enhance the efficiency of Teams meetings.
We hope this blog helps you to manage meeting requests in Microsoft Outlook. For any queries, don’t hesitate to reach us in the comments section.