Block Meeting Room Bookings in Exchange Online Using PowerShell
In today’s hustling work environment, efficient management of meeting room bookings is essential to ensure optimal utilization of resources. In certain scenarios, it is necessary to block meeting room bookings to limit access for certain rooms, to prevent unauthorized reservations, to ensure availability for specific users, and to avoid booking overflows. One of the ways to achieve this is to ensure optimal resource allocation, by finding a way to block meeting room bookings.
Hopefully, this task can be achieved with the power of the Exchange admin center and PowerShell. While EAC provides a graphical UI, it lacks some features compared to PowerShell, such as limiting specific users to book a meeting room and disabling auto-accept meetings.
In this blog, let’s explore how to perform some operations to block bookings to Microsoft 365 meeting rooms using PowerShell.
Meeting rooms in Microsoft 365 refer to meeting spaces associated with a room mailbox. A room mailbox is a type of resource mailbox that is assigned to a physical location such as a conference room, an auditorium, or a training room. The purpose of this room mailbox is to allow/restrict access to the meeting space location upon meeting requests within the organization.
Users can easily book or reserve a meeting room by selecting it from the location option while scheduling a meeting.

After scheduling a meeting, the Exchange Online resource booking assistant works in the background on the configured policies for room mailboxes. It checks for incoming meeting requests directed to room mailboxes and verifies the availability of rooms concerning the policies. After the successful verification, it proceeds to accept the request to confirm the booking and rejects the meeting requests if the verification fails.
To further customize the calendar entries, you can control whether the organizer’s name is displayed and prevent the subject from being removed from the calendar event, ensuring meeting subjects are visible in room mailboxes.
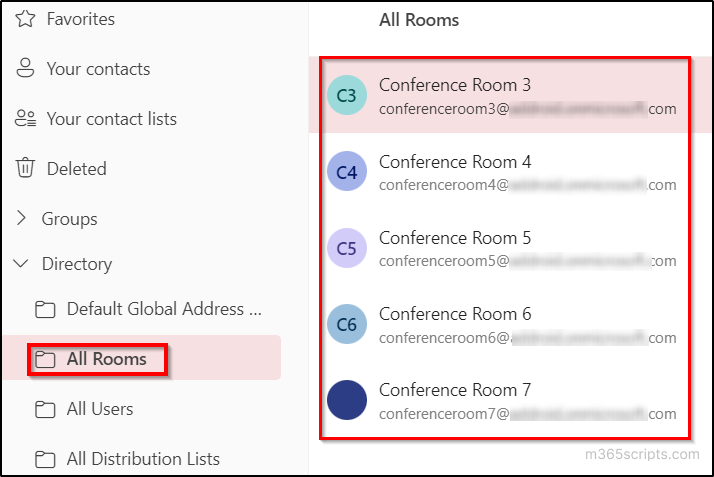
Microsoft 365 users can easily view the list of meeting rooms available through the “All Rooms” folder available in the “Directory Section” of the Outlook People tab. This folder gives an overview of the meeting rooms available in your Microsoft 365 organization. Moreover, you can get detailed Microsoft 365 room mailbox reports with the help of PowerShell scripting.
Before getting into block meeting rooms, here are some ways to restrict the users from booking a specific meeting room:
Hide Mailbox from GAL in Microsoft 365: Hiding the room mailbox from the Global Address List ensures that the details of the room mailbox are not visible to users. Due to this action, rooms won’t appear in Room Finder when scheduling meetings, making it difficult for users to discover or select it. As a result, users may not try to book these room mailboxes, because of not knowing about the meeting room. However, hidden room mailboxes can be booked by users who know the UPN or the name of the room.
Meeting Room Booking Policies: Applying policies to meeting rooms with the Exchange admin center or PowerShell can block users from accessing the meeting rooms in certain scenarios. These policies can specify maximum booking duration, advance booking time, repetitive meeting bookings, and restrict auto acceptance.
Block Meeting Room Booking with Delegates: Blocking meeting room bookings with delegates grants access to a Microsoft 365 user, allowing them to accept or reject bookings on behalf of the meeting room. This ensures that users can’t book a room without the approval of the delegated user.
By utilizing PowerShell cmdlets, you can limit and block access to meeting rooms in Exchange Online. Leveraging this can help to manage room mailbox availability, prevent conflicts, and optimize room utilization within your Microsoft 365 organization. Here are the ways to block and limit meeting room booking using PowerShell:
- Limit Specific Users to Book Microsoft 365 Meeting Room
- Disable Accepting Meeting Room Bookings in Outlook
- Configure Delegates for Meeting Room Bookings
- Block Room for Meeting Exceeds Meeting Time Limit
- Restrict Advance Booking for Meeting Rooms Using PowerShell
- Block Meeting Room Bookings for Repeating Meetings
First of all, make sure to install and connect to Exchange Online PowerShell to block and limit meeting room bookings using PowerShell.
Limiting specific users to book a meeting room allows them to reserve the room while blocking others from doing so, ensuring exclusive access for authorized individuals. You can use the following cmdlet to allow only specified users to schedule the respective meeting room and block others.
|
1 |
Set-CalendarProcessing -Identity <RoomNameOrUPN> -BookInPolicy <UserUPN> -AllBookInPolicy $False -AllRequestInPolicy $False |
Replace <RoomNameOrUPN> with the room mailbox name or UPN and <UserUPN> with the user UPN that must be allowed to access the meeting room.
For example, replacing the room name as “Conference Room” and user UPN as “[email protected]” allows only the user “John” to book the “Conference Room”.
In addition to the above operation, you can use this “Set-CalendarProcessing” cmdlet to allow only specific users to book meeting rooms, with or without delegate approval, based on availability and permissions.
Note: This cmdlet is specifically designed to enable the room mailbox bookings only for users within your Microsoft 365 tenant. It cannot be used to grant permission for external users, even if the room mailbox is configured to allow external users to book meeting rooms.
Disabling auto-accept meetings automatically declines meeting room bookings. This ensures that users can’t book a meeting room that is disabled to auto-accept bookings. You can use the below PowerShell cmdlet to disable the auto-accepting feature for room mailboxes.
|
1 |
Set-CalendarProcessing -Identity <RoomNameOrUPN> -AllBookInPolicy $False -AllRequestInPolicy $False |
Here, the cmdlet updates the policy settings to not accept the meeting request, even if the meeting room is free from bookings. Replace the <RoomNameOrUPN> with the room mailbox name or UPN.
For example, replacing the room name as “Conference Room” blocks every meeting room booking for the “Conference Room” and sends a declined message.
Providing delegated access to users gives them the capability to either accept or block requests for booking a meeting room on behalf of the meeting room’s owner. This ensures that users can’t book a room without the approval of the delegated user. The requests can also be accepted/blocked by users who have delegated access to the respective room mailboxes.
|
1 |
Set-CalendarProcessing -Identity <RoomNameOrUPN> -AllRequestInPolicy $true -AllBookInPolicy $false -ResourceDelegates <DelegatedUser> |
Executing the above cmdlet assigns access to the user(s) for accepting or declining a user Microsoft 365 meeting room booking. Replace <RoomNameOrUPN> with the room mailbox name or UPN and <DelegatedUser> with the UPNs of the user(s) to be delegated.
For example, replacing the room name as “Conference Room” and delegated user as “John” provides permission for the user “John” to accept or restrict booking requests on behalf of the “Conference Room”.
Also, note that you cannot directly add a new user to existing ResourceDelegates list using Set-CalendarProcessing cmdlet, because it overwrites the current list. Any names you specify will replace all existing delegates.
You can block users from accessing the Microsoft 365 meeting room by setting up a usage time limit. This ensures that the meeting room is always blocked for meetings with bookings exceeding the time limit.
|
1 |
Set-CalendarProcessing -Identity <RoomNameOrUPN> -MaximumDurationInMinutes <TimeInMinutes> |
The above cmdlets reject the meeting room booking requests which exceed the maximum specified time limit. Replace <RoomNameOrUPN> with the room mailbox name or UPN and <TimeInMinutes> with the maximum minutes.
For example, replacing the room name as “Conference Room” and time in minutes as “30”, allows the user to book “Conference Room”, for a maximum duration of 30 minutes meeting.
You can determine the maximum number of days in advance users can book the meeting room. By determining this, meeting rooms are consistently unavailable for bookings with meetings that extend beyond the specified limit.
|
1 |
Set-CalendarProcessing -Identity <RoomNameOrUPN> -BookingWindowInDays <NumberOfDays> |
After the execution of above cmdlet, it automatically rejects the requests with meetings having an end date beyond this limit specified in the “BookingWindowInDays” parameter. Replace <RoomNameOrUPN> with the room mailbox name or UPN and <NumberOfDays> with the maximum number of days in advance users can book.
For example, replacing the room name as “Conference Room” and number of days as “30”, restricts the user to book “Conference Room”, 30 days before the commencement of a meeting.
To restrict the reservation of meeting rooms for recurring or repeated meetings using PowerShell, utilize the below cmdlet.
|
1 |
Set-CalendarProcessing -Identity <RoomNameOrUPN> -AllowRecurringMeetings $false |
In the above cmdlet “AllowReccuringMeetings” parameter decides the action to block or allow repeated meetings. Here, replace <RoomNameOrUPN> with the room mailbox name.
For example, passing “Conference Room” as an attribute for the parameter “Identity”, blocks repetitive meetings in the Conference Room.
The above cmdlet disables the acceptance of recurring meeting bookings. However, it does not cancel existing recurring meetings that have already been scheduled. This means recurring meetings must be manually deleted if they should no longer be held in the respective meeting rooms. If the user who created the recurring meetings has left the organization, you can delete recurring meetings scheduled by former employees using various methods based on the need.
After making changes to the room mailbox with anyone above policies, you can revert it back to default with the help of the following cmdlet.
|
1 |
Set-CalendarProcessing -Identity <RoomNameOrUPN> -BookInPolicy $null -AllBookInPolicy $True -AllRequestInPolicy $False -ResourceDelegates $null -AutomateProcessing AutoAccept -MaximumDurationInMinutes 1440 -BookingWindowInDays 180 -AllowRecurringMeetings $true |
Here, replace <RoomNameOrUPN> with the room mailbox name that policies need to be reverted to default.
Also, you can view the assigned policies and the calendar details with the help of the below cmdlet.
|
1 |
Get-CalendarProcessing –Identity <RoomNameOrUPN> |fl |
Replace <RoomNameOrUPN> with the room mailbox name to view the assigned policies and the calendar details of the respective room mailbox.
Though the above powerful strategies and techniques provide you a proper meeting room scheduling process, there are several challenges in managing room mailboxes for enhanced collaboration. But by understanding the broader challenges of managing Exchange Online room mailboxes, we‘ve got just the solution for you with AdminDroid. You may wonder “What is the need for AdminDroid over the native Office 365 reporting tool?”. Native reporting tool only provides limited information on Exchange Online room mailboxes, and it is hard to monitor and track room mailbox activities and its usage. But, by using this tool you can get required information for all types of mailboxes in Microsoft 365 environment in a single with a few clicks.
The AdminDroid Exchange Online reports provide a complete overview of EXO mailboxes including room mailboxes with in-depth details and graphical representation. Here is the list of room mailbox reports available in AdminDroid with rich filter customizations.
- Room mailboxes information report
- Report on active/inactive room mailboxes
- Report on recently created/deleted room mailboxes
- Room mailboxes with send on behalf/send as report
- Room mailboxes with full permission/read permission
- Guest users with access to room mailboxes report
- Report on audit enabled/disabled room mailboxes


In addition, the AdminDroid Exchange Online management tool offers over 170+ Exchange Online reports, providing a comprehensive overview of Microsoft 365 mailboxes. These cover a wide range of reports which includes Exchange Online insights reports, Exchange Online audit log reports, and analytic reports. This management tool helps to take control over Exchange mailbox management, mailbox permissions, mailbox usages, mailbox changes, etc.
Overall, AdminDroid Office 365 reporting tool offers 1800+ pre-built reports and 30+ dashboards to simplify management across Azure AD, Security, Exchange Online, SharePoint Online, Microsoft Teams, Yammer, OneDrive, and more. Dive into the depths of your Microsoft 365 environment with advanced capabilities such as reporting, auditing, analytics, usage statistics, security & compliance, etc.
Experience the features and functionalities of AdminDroid reporting tool with the free 15-day premium edition. So, don’t wait, download AdminDroid and unlock powerful insights into your Microsoft 365 environment.
Overall, I hope that this blog will give you an idea to block users from accessing a meeting room in various scenarios. Please don’t hesitate to share your queries in the comments section. Stay tuned!
