Enable Litigation Hold in Office 365 Using PowerShell
Enable litigation hold in Office 365 to retain deleted mailbox items and modified email versions for legal investigations. Place time-based or infinite holds on user mailboxes using Exchange admin center or PowerShell. Ensure proper licensing with Exchange Online Plan 2 or Microsoft 365 E3/E5 subscriptions.
Organizations must retain all the emails, calendars, etc., including the deleted items related to specific individuals for security purposes and future case investigations. Then you may think that how to retain all the emails even if it gets deleted from Outlook. Thus, Microsoft enables litigation hold in Office 365 to retain the modified email messages and deleted mailbox items from the Recoverable Items folder. All you need is to place the litigation hold on specific mailboxes, all users, or groups based on your requirements.
Therefore, let us see how we can manage the litigation hold in Office 365 in this article.
Litigation holds are a way to retain deleted mailbox items and the original versions of modified contents. You can place both a time-based hold and infinite hold for any mailbox.
Placing mailboxes on hold can help the organization in legal case investigations. Thus, it is necessary to retain electronically stored information (ESI) like emails, calendar items, etc., in the organization.
Admins will frequently encounter the below error while placing a mailbox on hold.
Your Microsoft Exchange Online license doesn’t permit you to put a litigation hold on this mailbox.
Generally, this occurs due to insufficient license plans in the organization. So, to place a user mailbox on litigation hold, they must have one of the following licensing plans:
- Exchange Online Plan 2
- Microsoft 365 E3
- Microsoft 365 E5
- Office 365 E3
- Office 365 E5
Suppose, if you have Exchange Online Plan 1 license, you need to assign the Exchange Online Plan archiving license to place the litigation hold on a mailbox.
Admins can enable litigation hold on specific mailboxes using the Exchange admin center. Therefore, to set up a litigation hold for the user’s mailboxes, follow the steps below:
- Open Exchange admin center.
- Navigate to Recipients → Mailboxes in the left pane.
- Now select the user for whom you want to place a litigation hold.
- After selecting the user, click on the Others tab.
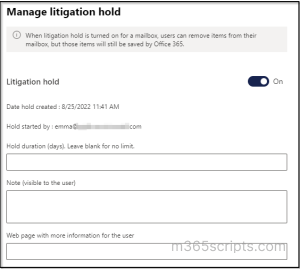
- Lastly, click the Manage the litigation hold to enable it.
Note: Likewise, you can also specify the hold duration and add a note informing the user about the hold.
The following are the impacts of placing a user mailbox on litigation hold:
- When you enable litigation hold, the Recoverable Items folder storage quota gets increased from 30 GB to 100 GB by default.
- The user’s archive mailbox items will be retained.
- The Recoverable Items subfolder holds the permanently deleted items by the user.
- Mailbox items purged from the Recoverable Items folder will be retained.
Moreover setting up an Exchange litigation hold is easy, but it’s impossible to place a litigation hold for all users or bulk users using the Exchange admin center. Also, it is difficult to gather all the details about users with and without a litigation hold.
So, we have to go with the task automation in PowerShell. Let’s take a close look at how to enable litigation hold using PowerShell.
It’s now easier than ever to place mailboxes on litigation hold with PowerShell! But, before proceeding, make sure you connect to Exchange Online PowerShell.
Here are different use cases for placing mailboxes on hold.
- Check Whether a User Mailbox has Litigation Hold
- Extracting List of Users with Litigation Hold Enabled and Without.
- Enable Litigation Hold for a Specific User.
- Enable Litigation Hold for All Users.
- Place Litigation Hold for Bulk Users (Import CSV)
- Assign Litigation Hold to Users Who Have Not Enabled Before.
- Enable Litigation Hold for a Specific Group or Department
- Set up Office 365 Litigation Hold Duration.
- Disable Litigation Hold Using PowerShell.
Therefore, to verify the litigation hold status for a specific user mailbox, use the cmdlet given below.
|
1 |
Get-Mailbox [email protected] | FL LitigationHold* |

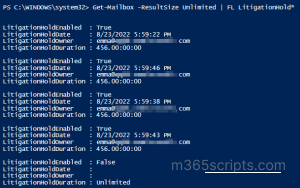
To check the litigation hold status of all the user mailboxes, use the following cmdlet. Also, you can export the mailbox hold report for a detailed analysis of user mailboxes with litigation hold and without.
|
1 |
Get-Mailbox -ResultSize Unlimited | FL LitigationHold* |
Next, to enable litigation hold for specific Office 365 users, use the Set-Mailbox cmdlet with the LitigationHoldEnabled parameter.
|
1 |
Set-Mailbox -Identity [email protected] -LitigationHoldEnabled $True |
Note: The above cmdlet places a mailbox on litigation holds for an infinite period.
To enable the litigation hold for all the users regardless of their litigation hold status, set it up using the cmdlet given below.
|
1 |
Get-Mailbox -ResultSize Unlimited -Filter "RecipientTypeDetails -eq 'UserMailbox'" | Set-Mailbox -LitigationHoldEnabled $true -LitigationHoldDuration 456 |
To place all the mailboxes on litigation hold for an infinite time, you can remove the LitigationHoldDuration parameter from the above cmdlet.
To set up litigation hold for only selected users, you can import the User Principal Name of the users in a CSV file, and execute the below cmdlet.
Required Fields in CSV file:
Create a CSV file with the User Principal Name of the Office 365 users.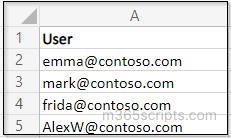
|
1 2 3 4 5 6 7 8 9 10 11 12 13 14 |
Connect-ExchangeOnline $User = Import-Csv C:\setlitigationhold.csv foreach($user in $user){ Write-Progress -Activity "Placing litigation hold to -$user..." Set-Mailbox -Identity $User.User -LitigationHoldEnabled $True If($?) { Write-Host Placed Litigation Hold Successfully to $User.user -ForegroundColor Green } Else { Write-Host Error occurred while placing litigation hold to $User.user -ForegroundColor Red } } |
Previously, admins should find out the users without litigation hold manually and place the hold for the required users. Now instead of the manual process, admins can achieve it using the below cmdlet.
|
1 2 |
Get-Mailbox | Where {$_.LitigationHoldEnabled -match "False"} | ForEach-Object { $Identity = $_.alias; Set-Mailbox -Identity $Identity -LitigationHoldEnabled $True} |
This cmdlet finds and enables the litigation hold for the mailboxes that haven’t been assigned before.
Placing all mailboxes on hold may sometimes expose you to ransomware attacks, storage issues, etc., so it’s best to enable litigation hold for the required Office 365 groups or specific departments in the organization. Therefore, run the below cmdlet to set a particular department of Office 365 users on hold.
|
1 |
Get-Recipient -RecipientTypeDetails UserMailbox -ResultSize unlimited -Filter '(Department -eq "Legal")' | Set-Mailbox -LitigationHoldEnabled $True |
You can specify the litigation hold duration for the user mailbox by configuring the LitigationHoldDuration parameter in the Set-Mailbox cmdlet.
|
1 |
Set-Mailbox [email protected] -LitigationHoldEnabled $true -LitigationHoldDuration 1095 |
Note: Mention the hold duration in terms of days. (i.e., if you want to set litigation hold for three years, set approximately 1095 days)
Litigation hold won’t let you delete emails or mailbox items. Thereby your storage capacity exceeds the mailbox quota over time. So to disable litigation hold from a specific recipient, you can set the LitigationHoldEnabled parameter to False. This will automatically turn off the litigation hold for the given mailboxes.
|
1 |
Set-Mailbox -Identity [email protected] -LitigationHoldEnabled $False |
To remove litigation hold from all mailboxes in Exchange Online, then you can set the LitigationHoldEnabled parameter to False
|
1 |
Get-Mailbox -ResultSize Unlimited -Filter {RecipientTypeDetails -eq "UserMailbox"} | Set-Mailbox -LitigationHoldEnabled $False |
Placing litigation hold in Microsoft 365 mailboxes is like putting a padlock on a treasure chest, but it’s only half the battle! Therefore, it’s essential to monitor mailbox hold reports frequently and ensure that the required mailboxes are put on hold properly.
But monitoring mailbox hold reports using PowerShell lacks comprehensive information on the no of mailboxes on hold, the types of holds implemented, or when holds were placed or removed. 👎
-
- This limited view of an organization’s mailbox hold status makes it challenging to identify compliance issues, resulting in potential errors and time-consuming processes.
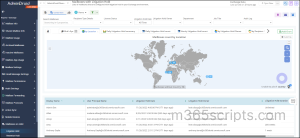
So, therefore let me serve you with the best Microsoft 365 reporting tool, AdminDroid. This provides detailed mailbox hold reports on litigation hold, retention hold, and in-place hold with a more granular view of hold duration, owner, mailbox type, hold date, etc. Moreover, the AdminDroid Exchange Online reporting tool provides an in-depth analysis of Exchange Online mailboxes allowing you to explore specific details like the start and end dates of retention periods, mailbox types, departments, and much more.
That’s it! There you go. I hope we’ve shown a clear idea of how to manage the litigation hold in Office 365. If you need further assistance with litigation hold, feel free to reach us in the comment section. We would be glad to assist you!
Therefore, get started now with the AdminDroid Exchange Online management tool to streamline and enhance your Exchange Online environment. Not only does AdminDroid provide mailbox hold reports, but it also provides crystal-clear metrics on mailbox usage, mailbox permission changes, and mailbox access details! Moreover, AdminDroid provides a 360° view of all Microsoft 365 services with over 1800 reports and 30+ visually appealing smart dashboards.
Can’t believe it? Try out the AdminDroid live demo today and experience Microsoft 365 reporting in real-time!