Encrypt Email in Microsoft Outlook to Safeguard your Sensitive Information
In today’s world, email communication is a part of everyday life. Every one of us sends and receives emails in our work environment. Are they utterly secure? Are we the only ones seeing? The questions that bothered me might bother you too. Emails are considered to be the common channel for cyber security threats such as spoofing, spam, phishing attacks, etc. And also, approximately 7 million records are exposed to compromise every day since they are not encrypted. So, here’s where email encryption comes into play to drop all your security concerns!
Encryption encrypts the data by converting readable text into scrambled cipher text. So, it is a process of encoding information such that only authorized persons can access the data.
Thus, encrypting Outlook email messages is significant for safer communication, especially when you share your personal information or financial data like pay slips, credit card statements, etc. So, it is important to encrypt emails and safeguard your sensitive data. Therefore, in this blog, let us get to know what email encryption is and its features in depth.
Email encryption hides the original content of email messages into cipher text and does not allow anybody to view it except for the recipients.
As said before, encrypting the mail content plays a significant role in communication. Usually, the sender encrypts the email message with the public key while sending them to the recipient. The sent message is decrypted only by the recipient, who has a private key, matching the sender’s public key.
- The primary reason for using mail encryption is for protection against spoofing and phishing email attacks.
- Email encryption not only adds a layer of security to mail communication but also helps to identify the authentic senders.
- Many compliance regulations like HIPAA, CJIS, and CFPB require encryption, whereas GDPR strictly recommends it while sending electronic Personal Health Information(ePHI) or Personal Identifiable Information (PII). So, email encryption is an effective method for safeguarding against compliance issues and satisfying regulations like HIPAA, CJIS, CFPB, and GDPR.
Not only does encryption enhance an organization’s security posture, but also simplifies their email workflows by letting employees securely send emails without relying on external programs or tools, resulting in streamlined efficient communication
In general, you can encrypt emails in Outlook using three methods.
- S/MIME Encryption – Secure/Multipurpose Internet Mail Extensions uses unique digital certificates to send digitally signed and encrypted email messages. Encrypting the email provides only protection but the digital signature helps the recipient to validate your identity.
NOTE: The sender and recipient should have applications that support this standard to use this encryption method.
- Microsoft 365 Message Encryption – To use Microsoft 365 message encryption, the sender must have any of the below licenses.
- Office 365 Enterprise E3 or E5
- Office 365 Education A3 or A5
- Office 365 Government G3 or G5
- Microsoft 365 Business Premium
- Microsoft 365 E3 or E5
Microsoft 365 Message Encryption is a cloud-based service that allows you to send encrypted emails to anyone, regardless of whether they have a Microsoft account or not. It works with various email services like Outlook.com, Yahoo!, and Gmail and primarily uses Azure rights management service to encrypt the email message and any attachments.
- Information Rights Management – IRM is a feature in Outlook that allows you to set permissions on email messages to control who can view, forward, or print them. It uses encryption and usage restrictions to protect messages and allows admins to create transport rules to apply IRM automatically on selected messages. And it also allows the users to manually encrypt using templates in Outlook on the web (formerly known as Outlook Web App).
As you are familiar with the encrypting methods, let us move on to the next part, how to encrypt emails in Outlook on the web.
In this section let us see what steps are to be followed to encrypt an email message in Outlook.
Firstly, add the ‘Encrypt’ action in the quick action toolbar, which makes it easy to access the setting. Now, proceed to select the Settings option in top right corner and follow the below procedure.
Settings > View all Outlook settings > Mail > Customize Actions > Toolbar > Encrypt > Save
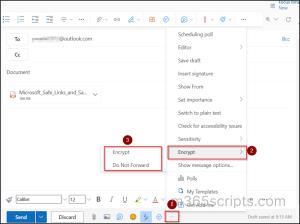
- This will add the ‘Encrypt’ option in the quick toolbar space. First, create a new mail or click on the message to be encrypted.
- Now, clicking on the ‘Encrypt’ option here gives you two options to choose from.
- Encrypt–This option primarily encrypts the message, where the recipient must decrypt it to read the mail. Here, the recipient can forward the message easily.
- Do Not Forward–It prevents the recipients from forwarding in addition to the basic encryption. This option not only restricts forwarding but also printing or copying the message on the recipient’s end.
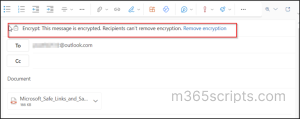
 3. If you choose the option ‘Encrypt’, an encryption message will be added to your email, as in the screenshot attached below.
As of now, we have seen email encrypting using IRM, further, let us get to know the procedure for configuring S/MIME encryption is as follows:
To enable S/MIME encryption, preinstall the required application and certificates on your device after getting approval from your organization’s IT administrator. These unique digital Outlook encryption certificates are used for verifying the digital signature and message encryption. Thus, without those certificates S/MIME extensions can’t be used.
If you’re planning to encrypt with S/MIME encryption, click on the ‘Encrypt this message (S/MIME)’ option above and encrypt your email.
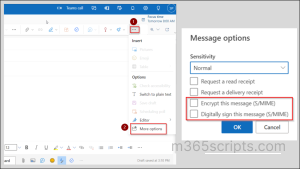
NOTE: You can’t encrypt the email message using both IRM and S/MIME methods. If you try to encrypt the message by both the methods, you will be notified with the error message stating that
“Messages that are protected with Information Rights Management can’t be encrypted with S/MIME as well. Please remove S/MIME encryption before sending”.
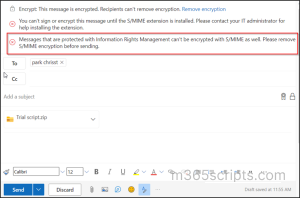
In case of encrypting email messages in Outlook desktop, follow the steps given below:
1) Select the message to be encrypted or write a new email.
2) Click the Options button and select Encrypt.
3) After that, set Encrypt only or Do Not Forward permission to your email message under the encrypt option.
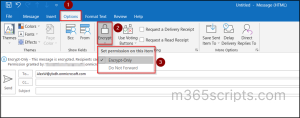
Now that we have seen how to encrypt emails in Outlook on the web and Outlook Desktop. Along with this, it is important to know the decrypting methods of encrypted email on the recipient’s end. Since we cannot always be the sender in this mutual communication!
Tip: You can also use the mail flow rule to encrypt the mail messages in Exchange Online. It simplifies the process, supports BYOK, and gives you better control over access and usability.
- Open encrypted mail like unencrypted messages in the Outlook.com website, Outlook mobile app, and Outlook mail app in Windows 10.
- However, to open the encrypted mail in Outlook for Mac, or a third-party mail app, a person has to follow the given set of procedures in the encrypted message or use a temporary passcode.
Opening an encrypted email in Outlook web, mobile app and Windows is a direct and straightforward method, but whereas opening the encrypted message in a third-party app is somewhat different. You can decrypt the email message by following the procedure given below:
- Click on the Read the message option in your email message.
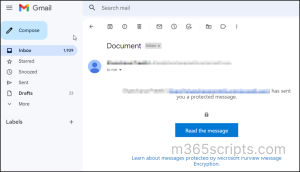
2.After that, you can open the message by signing in to your account.
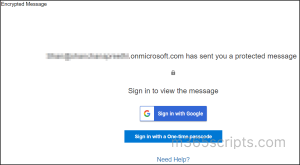
3. If you don’t own an account, you can sign in with one-time passcode. The one-time passcode will be sent to your registered email id, you can use the OTP and read the email message.
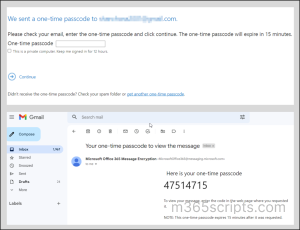
In such a way, you can view the encrypted mail in Microsoft 365 Outlook or a third-party mail app. Thus, it is not mandatory for a recipient to have a Microsoft account to view the encrypted message, you can also view them securely from your third-party mail apps.
As admins, we all know that reports play a significant part in our life. Reports are widely used for auditing. As Exchange admin, you might need to track users’ email activity in your organization. The upcoming reports will help you with information about the encrypted emails sent in your organization. This allows you to take necessary actions like creating transport rules and protect your organization from the data breaches. Inferring this information from admin center is quite difficult.
With PowerShell cmdlets, we can get detailed reports on encrypted emails in Outlook. But before diving deep into this topic, Connect to the Exchange Online PowerShell module.
In order to see the list of encrypted emails sent by specific user in the past 10 days run the following cmdlet after replacing the sender mail address with the specific UPN.
|
1 |
Get-MailDetailEncryptionReport -StartDate 02/28/2023 -EndDate 03/07/2023|Where{$_.SenderAddress -eq “[email protected]”-or $_.RecipientAddress -eq $Recipient}| Select Date,SenderAddress,RecipientAddress,Subject| Export-Csv -Path "C:\EncryptedEmailsSentBySpecificUser.csv" -NoTypeInformation -Append -Force |
Exported CSV File

The below cmdlet retrieves the information on the encrypted mails received by the specific user. Replace the mail address in the cmdlet with user mail address and mention the dates you want to retrieve in your organization.
|
1 |
Get-MailDetailEncryptionReport -StartDate 02/28/2023 -EndDate 03/07/2023|Where{$_.SenderAddress -eq $Sender-or $_.RecipientAddress -eq “[email protected]”}| Select Date,RecipientAddress,SenderAddress,Subject| Export-Csv -Path "C:\EncryptedEmailsReceivedBySpecificUser.csv" -NoTypeInformation -Append -Force |
Have a look at the screenshot for the execution of the cmdlet.
Exported CSV File

This report basically returns the top 10 users who have sent the most encrypted emails in your organization with the number of encrypted emails sent and the recipient address. This report will be helpful in compliance management and optimize email system performance.
|
1 2 3 4 5 6 7 8 9 10 11 12 13 14 15 16 17 18 19 20 21 22 23 24 25 |
Connect-exchangeonline $mail=Get-MailDetailEncryptionReport -StartDate 02/28/2023 -EndDate 03/07/2023 |sort-object SenderAddress -unique $hash=@() foreach($mails in $mail) { $mailreport=Get-MailDetailEncryptionReport -StartDate 02/28/2023 -EndDate 03/07/2023|Where{$_.SenderAddress -eq $mails.SenderAddress} $hash +=[PSCustomObject]@{ 'Sender' = $mails.SenderAddress 'RecipientAddress'=(@($mailreport.recipientaddress)-join ',') 'Count' = ($mailreport.SenderAddress).Count } } $hash|select 'Sender','RecipientAddress','Count'|Sort-Object Count –Descending|Select –First 10|Export-Csv -Path "D:\EncryptedEmailsSentByTopTenUser.csv" -NoTypeInformation |
Execution of the above script is shown below with the generated CSV file output.
Exported CSV File

Use this script to get the top ten users who receive the most encrypted emails in your organization with the sender address and the number of encrypted emails received by them. This report will be quite helpful for admins to manage the recipient policies.
|
1 2 3 4 5 6 7 8 9 10 11 12 13 14 15 16 17 18 19 |
Connect-exchangeonline $Domain=(Get-AcceptedDomain).DomainName $mail=Get-MailDetailEncryptionReport -StartDate 02/28/2023 -EndDate 03/07/2023 |sort-object RecipientAddress -unique $hash=@() foreach($mails in $mail) { $mailreport=Get-MailDetailEncryptionReport -StartDate 02/28/2023 -EndDate 03/07/2023|Where{$_.RecipientAddress -eq $mails.RecipientAddress} $position = ($mailreport.RecipientAddress).IndexOf("@") $DomainName=($mailreport.RecipientAddress).Substring($position+1) if($Domain -contains $DomainName) { $hash +=[PSCustomObject]@{ 'Receiver' = $mails.RecipientAddress 'SenderAddress'=(@($mailreport.senderaddress)-join ',') 'Count' = ($mailreport.RecipientAddress).Count } } } $hash|select 'Receiver','SenderAddress','Count'|Sort-Object Count -Descending|select -First 10|Export-Csv -Path "D:\EncryptedEmailsReceivedByTopTenUser.csv" -NoTypeInformation |
For execution look at the below screenshot.
Exported CSV File 
Don’t let confidential information fall into the wrong hands! Therefore, start encrypting emails that contain business, medical, or payment-related data when sharing them within or outside the organization. However, it’s important to remember that encryption is not necessary for every email, so be sure to use it wisely. For added security measures, consider using Exchange transport rules to manage and secure emails effectively, including handling spam emails from onmicrosoft.com domains.
Rather than protecting your organization from spoofing and phishing only by encrypting, better monitor emails imposing severe threats beforehand to avoid unnecessary risks. And here, retrieving detailed information on spoofed emails, like spoofed sender, true sender, SPF, DKIM and DMARC authentication check, etc., is not possible with the native admin center. 😞 Considering PowerShell, it eats up all your precious time in running cmdlets in the loop, even for a piece of minor information!
So, if you are searching for a perfect solution to monitor emails, then no worries – AdminDroid Microsoft 365 Reporter💡has got your back!
Identify all the spam, spoof, phishing, and malicious email that reach your organization instantly with AdminDroid mail protection reports. 🎯 Here you can find details of emails like sender address, recipient address, subject, and threat detected method to take immediate action.
In addition, AdminDroid identifies the top mail senders, receivers that are too spam and malware receivers of your organization and records them in mail traffic reports. Overall, admins can use this report to analyze completely and stay alert of invading risks & causes affecting business flow in email communication. 📧
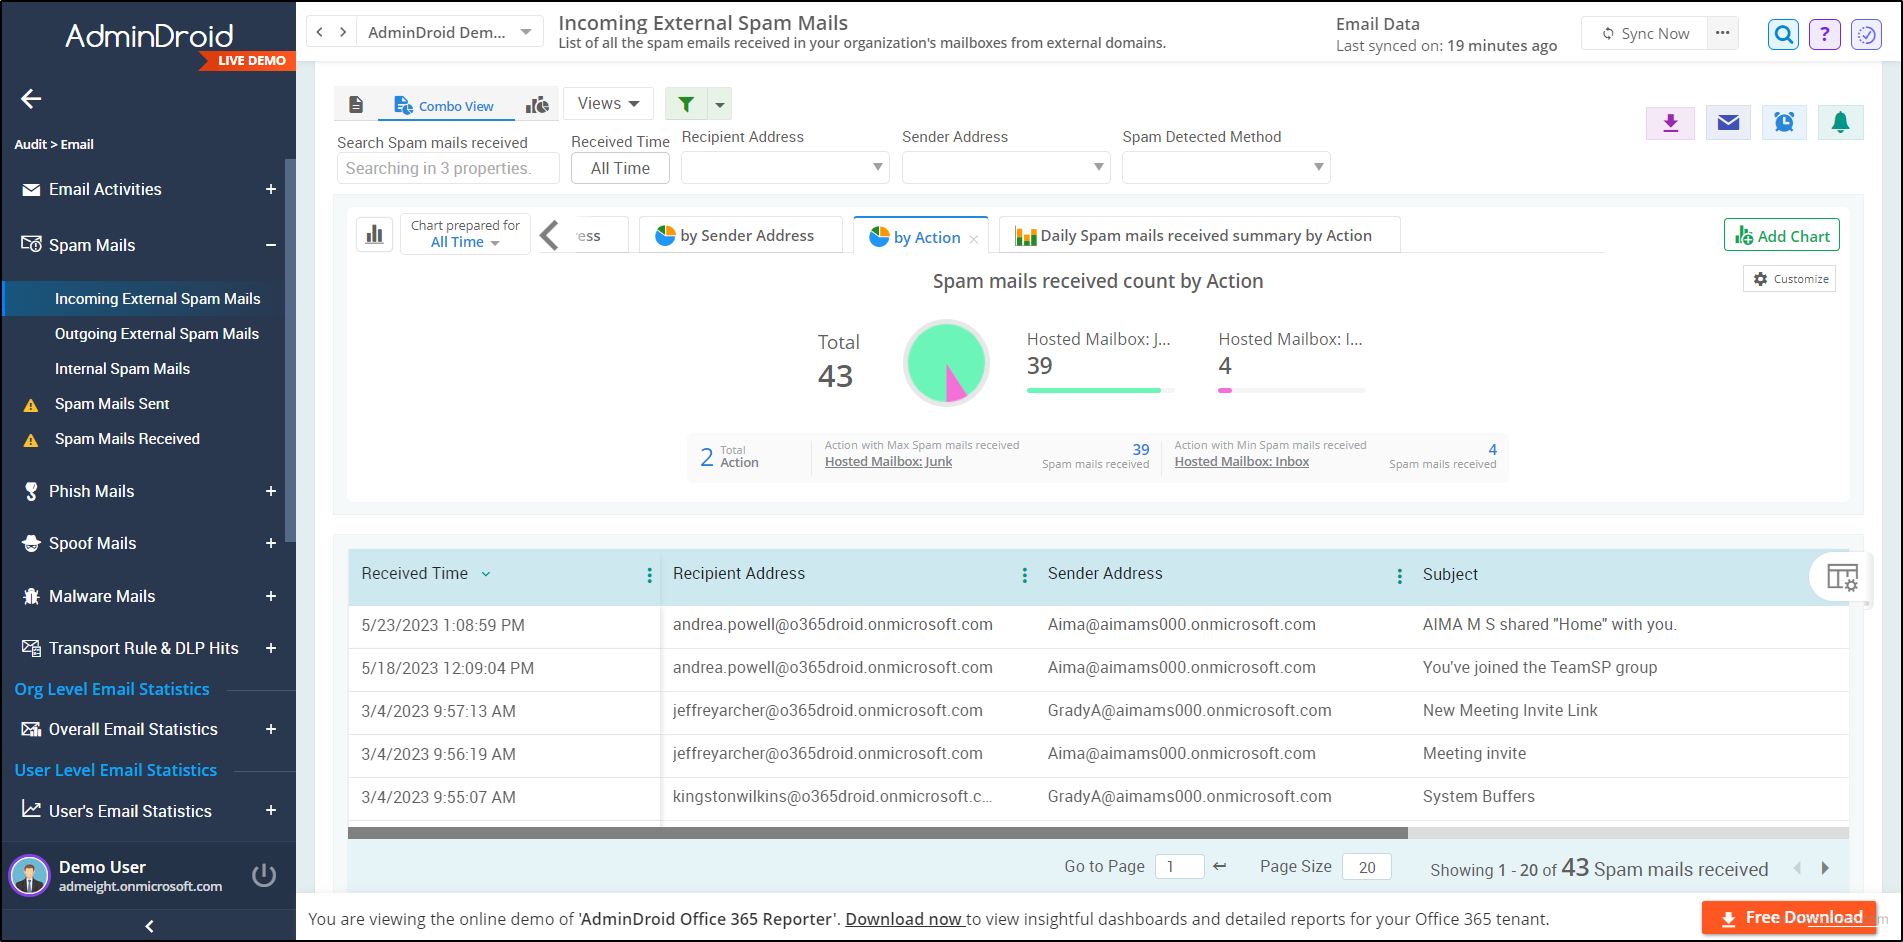
Also, AdminDroid provides a 360-degree view of all email activities within the organization through its AI-powered email dashboard .📍So, get started now and track the entire email activities of your Microsoft 365 instantaneously with this eye-striking dashboard!
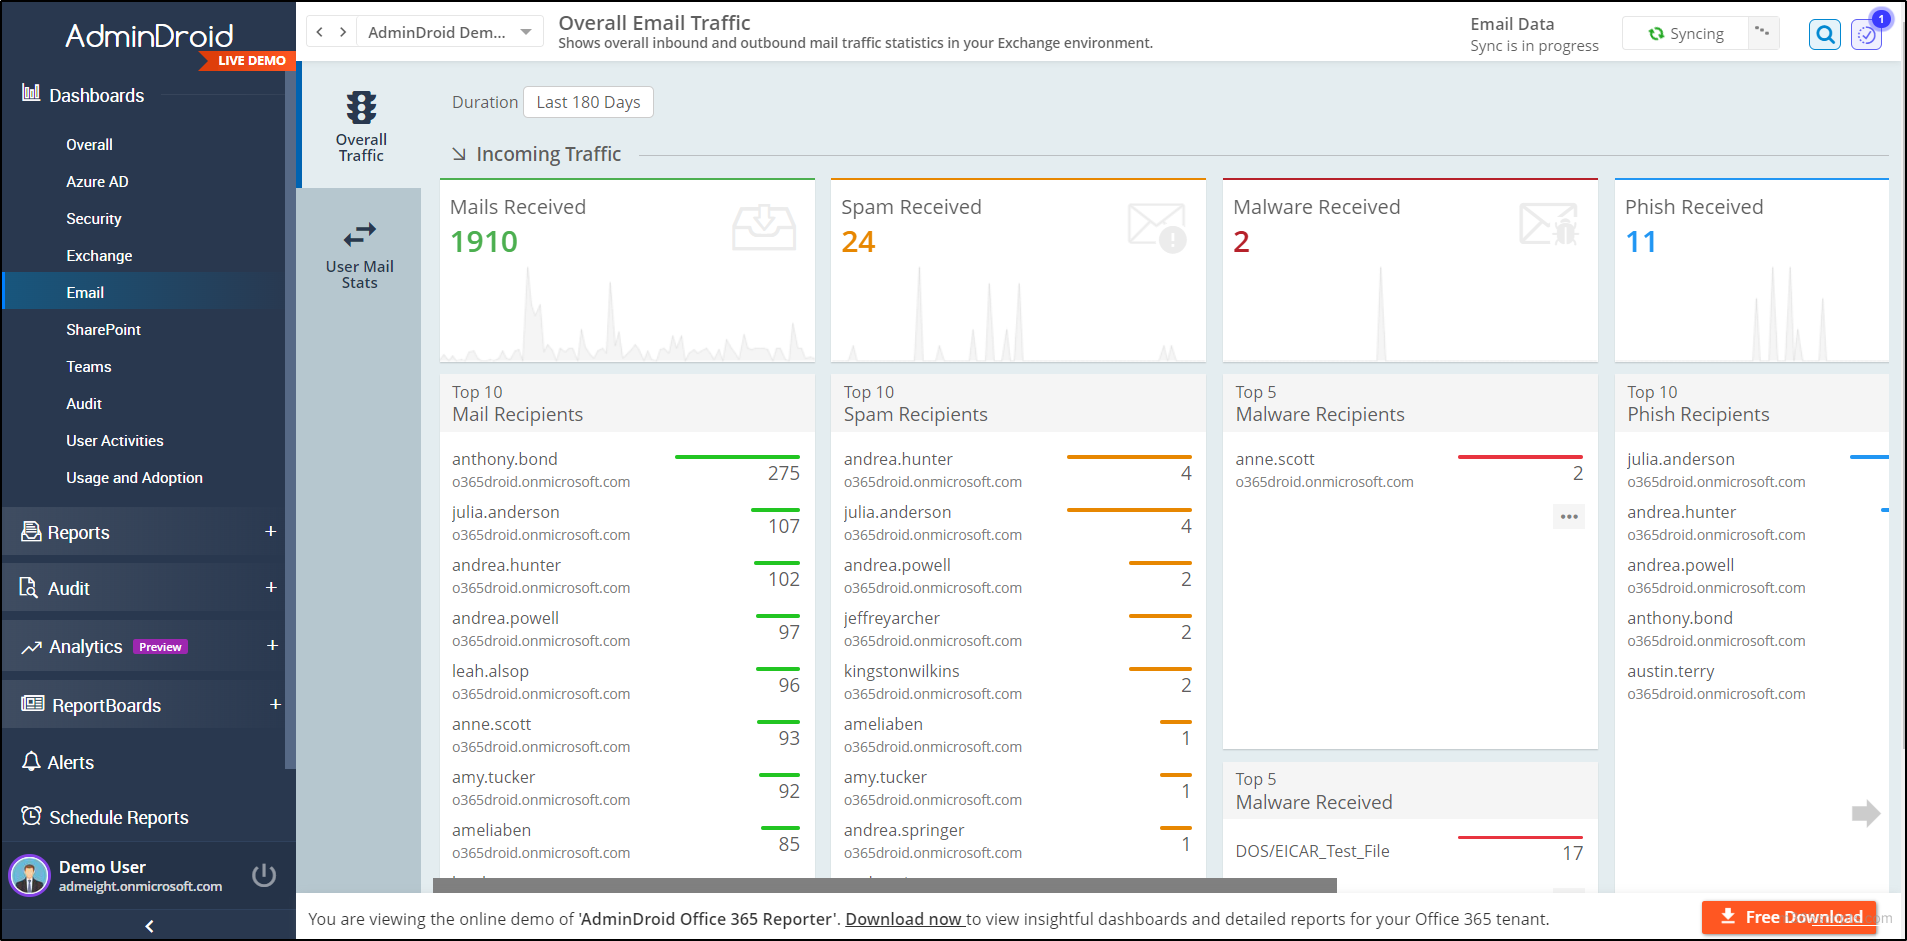
Ultimately, the AdminDroid email monitoring tool sets the path for your complete management of emails with its extensive granular reports. In addition to email monitoring, the AdminDroid Exchange Online management tool offers reports on mailbox permissions like Send-As and Send-On-Behalf, mailbox activities like incoming and outgoing bulk emails, organization & user-level email statistics, and transport rule messages. 📫
Still more! AdminDroid provides 1800+ comprehensive reports and 30+ sleek dashboards on various services of Microsoft 365, like Azure AD, SharePoint Online, Microsoft Teams, OneDrive, Exchange Online, and Yammer. Therefore, get rid of your conventional methods with its user-friendly interface and innovative alerting, scheduling, filtering, and delegation options.
Now wait for the perfect solution to be over! Start using AdminDroid now with a 15-day trial to experience advanced Microsoft 365 reporting and administrating capabilities.
Overall, take control of your email security with Outlook’s encryption feature and AdminDroid email monitoring tool to safeguard your confidential information today.
I hope this blog made you familiar with email encryption in Outlook. Try encrypting your important emails before sharing them! Share your experience and thoughts in the comments section.
