How to Block Risky File Types in Exchange Online?
Block dangerous file attachments in Exchange Online using transport rules or anti-malware policies. Configure mail flow rules to reject emails containing executable files, scripts, or other high-risk extensions from external senders. Strengthen email security against malicious attachments.
Recently, there has been a sharp rise in the click rates of malicious attachments, exposing a critical vulnerability in email communication within organizations. Cybercriminals are increasingly using malicious attachments to launch attacks. To combat this growing threat and strengthen email protection in Exchange Online, it is crucial to block specific high-risk file types. Let’s get started with how to block specific file types in Exchange Online.
To block attachment file types in Exchange Online, the following two methods can be used:
Transport rules, also known as mail flow rules, offer granular control over email messages. You can create a transport rule via two methods to block dangerous file extensions in Exchange Online.
To block dangerous file extensions from external senders using transport rules, follow the steps mentioned below:
- Sign in to the Exchange admin center.
- Navigate to Mail flow –> Rules.
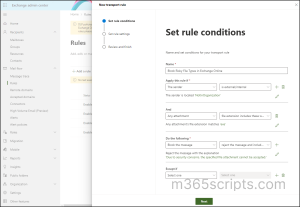
- Click + Add a rule and select Create a new rule.
- Provide a name for the rule.
- From the “Apply this rule if” dropdown, select The sender and is external/internal from the adjacent dropdown. Next, choose Outside the organization in the recipient location dropdown.
- Then, use the “+” icon to add the next condition. Under the “Apply this rule if” dropdown, select Any attachment. Once done, choose File extension includes these words option from the dropdown that appears next to it.
- Specify the file extensions you want to block one by one. (e.g., exe, bat, scr).
- Under the “Do the following”, select Block the message. Choose Reject the message and include an explanation or Reject the message with the enhanced status code of or Delete the message without notifying anyone, depending on how you want to handle blocked attachments.
- Configure exceptions as needed and click Next.
- Choose whether to Test rule with Policy Tips (to test without affecting users) or Enforce (to apply the rule immediately).
- Configure the severity level if you want to keep track of rule actions (optional).
- Set the rule’s activation date if you want to schedule when it should start and click Next.
- Review the rule settings and click Finish to apply the changes.
After creating a rule, you need to enable it. Navigate back to Mail flow –> Rule page and click on the rule you just created. Toggle the button to Enabled to change the status of the transport rule.
Admins can also perform email monitoring using PowerShell apart from the Exchange admin center.
To create a transport rule using PowerShell, connect to the Exchange Online PowerShell. Now, execute the following cmdlet to create a rule to block messages that contain specific file extensions.
|
1 |
New-TransportRule -Name "<UniqueName>" -AttachmentExtensionMatchesWords <filetype> -RejectMessageReasonText "<text>" -Enabled $true |
Replace <UniqueName> with a descriptive name for your rule (e.g., “BlockFileAttachments”). The -AttachmentExtensionMatchesWords parameter defines the condition that the rule will match against. Specifically, it matches the file extension of attachments in email messages.
For example,
|
1 |
New-TransportRule -Name "Block EXE Files" -AttachmentExtensionMatchesWords "exe" -RejectMessageReasonText "Executable files are not allowed." -Enabled $true |
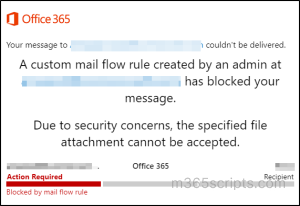
The sender will receive the following message when attempting to send an email with a blocked attachment in Outlook.
You can also use transport rules for more targeted measures like blocking spam emails from onmicrosoft.com domains.
An anti-malware policy in Exchange Online is a crucial component of a comprehensive email security strategy, providing proactive measures to defend against evolving cyber threats. By creating a targeted anti-malware policy, you can specifically block harmful file types from external senders, significantly boosting your Exchange Online email security. You have two effective methods to configure these policies for optimal protection.
- Create an anti-malware policy in the Microsoft Defender portal
- Modify the default anti-malware policy using PowerShell
To block file extensions using anti-malware policies, follow the steps mentioned below:
- Sign in to the Microsoft 365 Defender portal.
- Navigate to Email & collaboration –> Policies and rules –> Threat Policies –> Anti-malware.
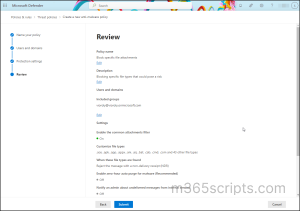
- Click on Create a new one.
- Provide a suitable name and description.
- Now, add users, groups, and domains to include or exclude in this policy.
- Under “Protection settings”, ensure that the “Enable the common attachments filter“ option is checked in.
- If you want to specify custom file types, click on ‘Select file types’ and add the desired file extensions to the blocklist.
- You can further customize the notification text sent to the admin by enabling the “Use customized notification text” option. This allows you to provide specific details or instructions in the notification email.
- Submit the anti-malware policy.
Note: By default, Outlook blocks certain file types to protect against viruses and other threats. For a list of blocked file types in Outlook, visit Microsoft Support.
Firstly, connect to Exchange Online PowerShell. Then, ensure that file filtering is enabled in the default anti-malware policy.
|
1 |
Set-MalwareFilterPolicy -Identity Default -EnableFileFilter $true |
To add the desired risky type to the list of file types in default anti-malware policy. For example, “html”.
|
1 2 3 |
$FileTypes = (Get-MalwareFilterPolicy -Identity Default).FileTypes + "html" Set-MalwareFilterPolicy -Identity Default -FileTypes $FileTypes |
To confirm that the HTML file type has been added to the list of blocked file types, run the below.
|
1 |
Get-MalwareFilterPolicy -Identity Default | Select-Object -ExpandProperty FileTypes |
That’s it! I hope this blog guided you to the detailed methods to block dangerous file types using transport rules and anti-malware policies. Feel free to reach out to us through the comments section if you have any queries!