Manage User Role Assignment Policies in Exchange Online
Configure Exchange Online role assignment policies to control user self-service actions on mailboxes and distribution groups. Create custom policies with specific permissions like MyDistributionGroups or MyContactInformation, then assign to users for granular control over mailbox feature access and security compliance.
In Exchange Online, role assignment policies let admins control what actions users can perform within their own mailboxes and the distribution groups they own. These policies act as predefined permission sets that enable or restrict mailbox features without granting higher privileges.
For organizations with diverse mailbox management needs, role assignment policies simplifies control over access permissions like distribution group membership, delegation, and more. Assignment policies help keep settings consistent, improve security, and give users the right level of access. In this blog, you’ll learn how to create and manage role assignment policies to align with your organization’s Exchange Online requirements.
An Exchange role assignment policy allows you to assign end-user permissions which are part of the RBAC (Role Based Access Control) model to control what self-service actions users can do. This ensures that users have just the right level of access to features they need, while reducing the risk of misconfigurations or security issues in your environment. For example, if a policy includes the “MyDistributionGroups” role, users can create, delete, modify, and manage distribution groups they own.
- Enhance security: Prevent users from accessing features they shouldn’t (e.g., managing mailboxes or settings beyond their scope).
- Simplify management: Admins can assign a single policy to many users and control feature access from one place.
- Granular control: Fine-tune what users can do, like allow some users to create inbox rules but restrict group creation.
- Ensure compliance: Helps enforce organizational policies by limiting user access to sensitive mailbox features such as delegation or retention settings, reducing unauthorized changes.
- Easy updates: Modify a role permission in one policy, and apply to all users assigned to it, saving time.
To create a new role assignment policy in Exchange Online, you can follow the steps below.
Permission required: Exchange Administrator or Global Administrator role.
- Sign in to the Exchange admin center.
- Navigate to Roles>User Roles.
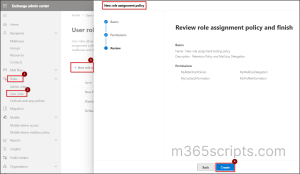
- Now, click on ‘+ New Role Assignment Policy’. This opens a new panel to create a custom role assignment policy.
- Name your policy and add a suitable description. Then, select ‘Next’.
- You’ll see a list of roles, check the boxes based on your needs and click ‘Next’.
- Review the role assignment policy and select ‘Create’.
- Once the policy is successfully created, click ‘Done’.
Note: By default, users will be assigned with the default role assignment policy, which includes roles such as MyBaseOptions, MyContactInformation, MyDistributionGroupMembership, MyTextMessaging, MyVoiceMail, MyProfileInformation, and more.
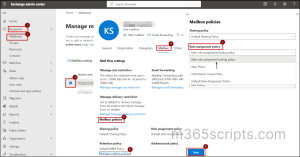
Once the policy is created, you’ll need to assign the policy to your users’ mailboxes. To apply the new policy to a specific user:
- Navigate to Recipients > Mailboxes in the Exchange admin center.
- Select the user you want to update.
- Click the Mailbox section.
- Under the Mailbox policies, click ‘Manage mailbox policies’.
- Select the created policy from the dropdown of ‘Role assignment policy’ tab.
- Click ‘Save’ and it may take up to 5 minutes for the changes to get reflected.
To delete a specific role assignment policy, follow the steps below.
- In the Exchange Admin Center, go to Roles>User Roles.
- Select the role assignment policy you wish to remove and then click the ‘Delete’ option.
- Click ‘Confirm’ to delete the role assignment policy.
Note: Before deleting a role assignment policy, make sure to remove all roles assigned and re-assign user mailbox with an alternate policy.
If role permissions are still attached and user mailbox isn’t re-assigned with alternate policy, then deletion will fail as below.
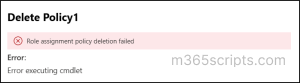
- To avoid this error, uncheck all the roles assigned and click ‘Save’ to get the changes updated.
- And re-assign the affected mailbox with different user role assignment policy and then proceed to click on ‘Delete’.

Though you can view, create, modify, and delete role assignment policies using the Exchange admin center, there are several limitations as follows:
- Firstly, you can’t assign users directly during the policy creation process in the EAC. You must manually navigate to each user’s mailbox once the policy is created, which becomes cumbersome when dealing with large user groups.
- Additionally, EAC does not support bulk actions. Creating multiple custom policies or assigning a single policy to hundreds of users is time-consuming and prone to error.
- You also can’t easily search, manage, or audit mailboxes based on assigned policies.
To overcome these limitations, Exchange Online PowerShell offers a more flexible and scalable way to manage bulk creation and deletion of role assignment policies. Before proceeding, you should connect to Exchange Online PowerShell.
Before creating a user role assignment policy, you can list all available roles (permissions) using the following cmdlet:
|
1 |
Get-ManagementRole | Where-Object { $_.RoleType -like "My*" } | Select Name |
The above cmdlet lists all management roles that can be assigned in a role assignment policy. Once you’ve identified the roles you want to include, create the policy using the cmdlet below.
|
1 |
New-RoleAssignmentPolicy “<Assignment policy name>” -Roles <Roles to assign> |
Here, configure the parameters accordingly.
Replace RoleAssignmentPolicy, Roles with a suitable name and role permission for your policy.
The above cmdlet will create a new user role assignment policy in Exchange Online.
Note: Always include essential roles like MyBaseOptions and MyContactInformation in custom policies so that users can set up email signatures, out-of-office replies, and their own contact information.
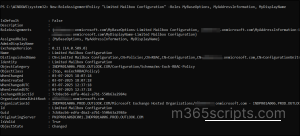
To create multiple role assignment policies in a single PowerShell execution, you can run the below script.
|
1 2 3 4 5 6 7 8 |
$policies = @( @{ Name = "<Policy-Support>"; Roles = @("MyBaseOptions", "MyMailboxDelegation") }, @{ Name = "<Policy-HR>"; Roles = @("MyBaseOptions", "MyContactInformation", "MyRetentionPolicies") }, @{ Name = "<Policy-Sales>"; Roles = @("MyBaseOptions", "MyDistributionGroupMembership") } ) foreach ($policy in $policies) { New-RoleAssignmentPolicy -Name $policy.Name -Roles $policy.Roles } |
This script will create multiple role assignment policies at once. You can perform this execution when there is a bulk creation requirement in your organization.
To delete a role assignment policy, run the cmdlet below.
|
1 |
Remove-RoleAssignmentPolicy –Identity” <Role assignment policy>” |
Identity: Name of the policy to delete.
The above cmdlet permanently deletes the created role assignment policy.

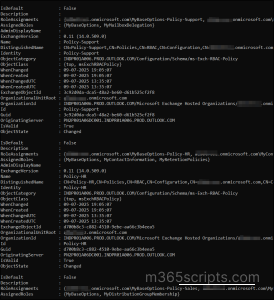
To add a role to an existing assignment policy, run the below cmdlet.
|
1 |
New-ManagementRoleAssignment -Name “<Role assignment name>” -Role <Role name> -Policy “<Assignment policy name>” |
Name, Role, Policy: Give a suitable name of the role, name of the role permission you want to grant, and name of the role assignment policy.
The above cmdlet displays the name of the role added along with a name of role assignment policy.

You can remove roles from role assignment policies by using the cmdlet below. After the cmdlet is executed, confirm the deletion by entering “Y” to delete.
|
1 |
Get-ManagementRoleAssignment -RoleAssignee “<Assignment policy name>” -Role “<role name>” | Remove-ManagementRoleAssignment |
Role Assignee, Role: Give name of the user role assignment policy and give the particular role permission you want to remove from that policy.
The above cmdlet removes only a specific role permission from the policy.

If you want to assign a specific policy to all user in specific CSV file, run the cmdlet below. For future use, rename the header in your CSV to UserPrincipalName, which lets you use simpler and safer syntax.
|
1 2 3 4 5 |
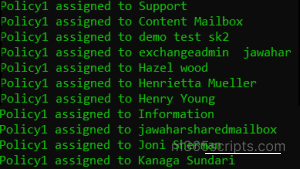
Import-Csv "<C:\UsersList.csv>" | ForEach-Object { $user = $_.”<UserPrincipalName>” Set-Mailbox -Identity $user -RoleAssignmentPolicy "<Policy1>" Write-Host "<Policy1 assigned to $user>" -ForegroundColor Green } |
CSV, Identity, RoleAssignmentPolicy: Give the path of the csv file stored, set the csv column name of the user mailboxes
and set a role assignment policy name.
Sample Input File:
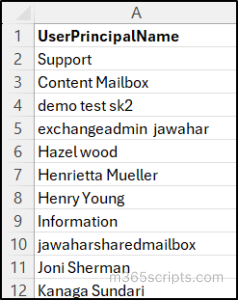
By running this script, you can assign a role assignment policy to a set of users’ mailboxes.
If you wish to assign policy to all mailboxes, then you can run the below cmdlet.
|
1 2 3 |
Get-Mailbox -ResultSize Unlimited | ForEach-Object { Set-Mailbox -Identity $_. ”<UserPrincipalName>” -RoleAssignmentPolicy "<Policy1>" } |
You can identify all mailboxes assigned to a specific role assignment policy by using the ‘Get-Mailbox’ cmdlet and filtering the results with the ‘Where’ cmdlet. This filter displays only the mailboxes that match the policy name you specify.
|
1 2 3 |
Get-Mailbox -ResultSize Unlimited | Where-Object { $_.RoleAssignmentPolicy -eq "<Policy1>" } | Select Name, UserPrincipalName, RoleAssignmentPolicy |
Eq(Equal): Name of the role assignment policy assigned to mailboxes.
The above cmdlet lists all the mailboxes that are linked to a specific role assignment policy.
Points to Remember
- Only one role assignment policy can be assigned per mailbox. Choose or customize policies based on user roles and needs.
- Changes to a role assignment policy apply to all mailboxes using it. To apply changes to specific users only, create a separate policy.
- Before deleting a role assignment policy, remove all associated role assignments and re-assign affected mailboxes to a different policy.
- Policy updates don’t take effect immediately. Allow some time for changes to reflect in Outlook or OWA.
- PowerShell is ideal for bulk tasks, so use it to assign, manage, audit or remove policies across multiple mailboxes efficiently.
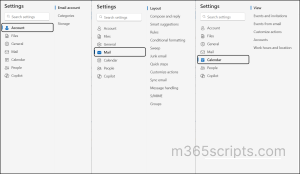
As an Exchange Online admin, understanding how to create and apply role assignment policies to user mailboxes helps to control which mailbox features users can manage themselves. From the end-user’s perspective, this directly impacts what options are available in Outlook Web App (OWA) or the Outlook desktop client.
This section demonstrates how user access to mailbox settings varies depending on the roles assigned through the role assignment policy.
User A:
This user is assigned a custom role assignment policy that includes roles such as MyBaseOptions, MyContactInformation and MyProfileInformation.
In Outlook, they can access:
- Set recurring automatic replies.
- Change time zone, date/time format, and language.
- Create or edit email signatures.
- Adjust message formatting (e.g., read receipts, default font).
- Configure mail display settings (reading pane, layout, etc.).
- Contact and profile information updates.
- Edit personal details like phone numbers, street address, city, state, zip, office location.
- Update job title, department, or company name.
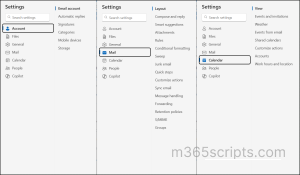
What actions user A can perform in their own mailbox:
User B:
This user is assigned a different role assignment policy that includes MyRetentionPolicies,MyMailboxDelegation,MyBaseOptions and other roles depending on your setup.
In Outlook, they can access:
- Set out of office replies.
- Change language, time zone, date/time format.
- Create or update email signature.
- Modify read receipt and message format preferences.
- Assign retention tags to emails and folders.
- Configure archive or deletion policies to manage mailbox content lifecycle.
- Access to “assign policy” in Outlook.
- Grant send as, send on behalf, or full access to others.
- Manage existing delegates from the Outlook or OWA interface.
What actions user B can perform in their own mailbox:
Tip: It’s necessary to understand how to assign roles to users ensuring only role-based access to users in your Microsoft 365 environment. Also, configuring OWA policies allows you to control which settings and features are available to users in their Outlook.
We hope this blog helped you understand how role assignment policies work and how to manage them effectively in Exchange Online. With the right policies in place, managing user permissions becomes simpler and more secure! If you run into any questions or challenges, don’t hesitate to reach out in the comments section, we’re here to help😊.