How to Replace the Root Site in SharePoint Online – A Complete Guide
Replace the SharePoint root site with modern communication sites when classic team sites no longer meet organizational needs. Use the Replace Site setting instead of deletion to maintain user access to sites and content. Swap outdated root sites with visually appealing modern alternatives through SharePoint admin center.
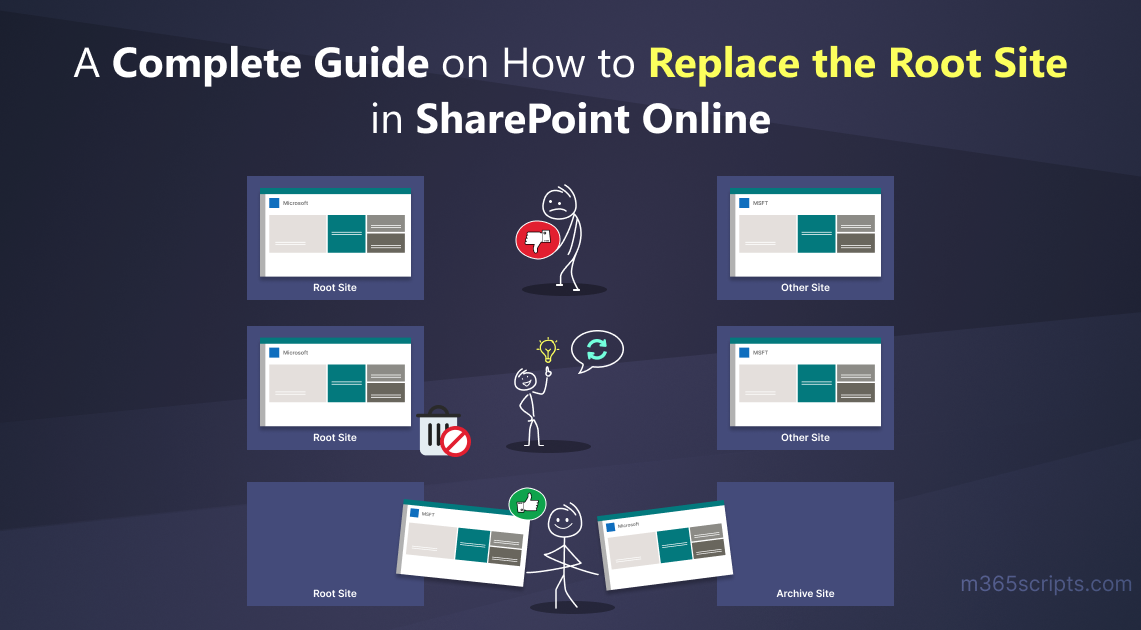
SharePoint sites are the gem of the Office 365 suite since they store and organize content for the users. Amidst all, the root site is a basic site that serves as the starting point to access resources within the SharePoint environment. Despite this, admins may decide to delete the SharePoint site as its hierarchy doesn’t meet the organization’s needs.
Unfortunately, deleting the root site will block the users from accessing the sites and site contents. So, what is your next step? Don’t worry! To help you with this, Microsoft has revoked the delete permission and provided the ‘Replace Site‘ setting to replace the root site in SharePoint Online with modern sites.
Therefore, let’s gear up to acquire more information on how to replace the classic root site with a modern site in Microsoft SharePoint Online effectively!
Root site is an inbuilt site that acts as a central hub for all the SharePoint Online sites.
SharePoint root site is the top-level site provided by Microsoft to users after purchasing the Microsoft 365 plan. It is the centralized location to access SharePoint Online sites and site contents in your Microsoft 365 organization.
Root site is essential for organizing and storing SharePoint content, making it easier for users navigating across sites. Before 2019, the root site was created as a classic team site. However, lately, Microsoft provides communication site as the default root site which is named as ‘Communication site’ with URL “<tenant name>. sharepoint.com”.
As SharePoint admins, it is critical to replace (swap) the SharePoint root site in order to achieve certain below objectives.
Outdated design: As the design of the root site may be outdated and basic, admins consider replacing the root site with visually appealing sites.
Site ownership changes: There are situations where the site owner of a root site in SharePoint Online may leave the organization, allowing a new owner to take over. In such cases, the new owner may want to customize and modernize the root site to better meet the needs of the organization.
Poor user experience: Admins may choose to replace their classic root site in SharePoint Online with a more modern and advanced site due to the poor user interface of the classic team site.
Thus, the above are the few reasons for replacing the classic root site in SharePoint Online.
It is important to go through the checklist below before initiating the SharePoint site swapping.
Featured links: Firstly, make note of the featured links that you added to your modern site. Because after site swapping, they will be no longer available. Therefore, you need to add them manually after replacing the root site.
Configure policies and permissions– Just make note of the policies and permissions of the classic root site before replacing the root site and configure the same for the modern site.
Notify site users: Alert the root site users about the site swapping, as it reduces the confusion on the sudden change and will help them to prepare for the changes. Also, if they are using site files on the site, ask them to close the files and remind them to check the recycle bin to ensure there are no files in it.
Availability of alternative sites: Make sure that you have a modern site that will be replaced with the classic root site. If not, then create a modern site. You can create a new team site/communication site in Microsoft SharePoint Online.
Besides prerequisites, there are some limitations while replacing the root site in SharePoint Online. They are,
- Both the classic site and the modern site should not be hub site or associated with a hub. If they are hub sites, unregister them as hub sites. After swapping, reregister them as a hub site. If they are associated with a hub, disassociate them. You can reassociate the replaced site post swapping.
- The modern site that you select as a hub site should lie in the same domain as the classic root site.
- You should swap a root site only with the communication site, team site (without Microsoft 365 group) or with a classic team site.
- Also, post-swapping, the subsites in the classic root site will be archived.
The above are the limitations that every admin should take into consideration while replacing the root site.
Replacing the root site will enhance the quality of the intranet for the users. You can follow the below methods to swap the root site with modern site easily.
Important: The global administrator and SharePoint administrator only have permission to replace the root site in SharePoint Online.
Also, make sure that you have a modern site available to replace the root site in the SharePoint environment.
Swapping the SharePoint root site will help organizations take advantage of new features, faster site provisioning, modern user interfaces and much more.
Thus, swap your root site using SharePoint admin center by following the steps below,
- Now, open the SharePoint admin center to replace your classic root site.
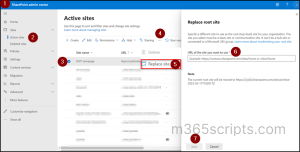
- Then, select Active sites from the left tab.
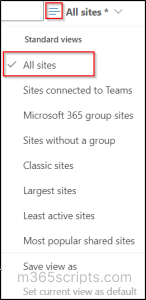
- Make all active sites visible to you by choosing All sites in the filter at the top right corner.
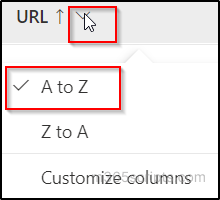
- Now, change the URL column view to “A to Z” to view them in alphabetical order, in such a way classic root site will appear at the top.
- Then, select the root site and click the ellipses (…).
- Click the Replace site and you will be given a dialogue box where you should enter the URL of the desired modern site.
- Finally, click Save.
Even though replacing the site using SharePoint admin center is user-friendly, some of the organizations prefer PowerShell to automate the process and gain more control over the operation.
PowerShell provides a flexible and easy cmdlet to replace the root site in SharePoint Online. Before diving into this further, make sure to connect SharePoint Online PowerShell.
Then, to swap your classic root site with the modern site, execute the following cmdlet with the required parameters.
|
1 |
Invoke-SPOSiteSwap -SourceUrl <URL of the modern site> -TargetUrl <URL of the existing root site> -ArchiveUrl <target Url/sites/user defined name> |
Now, enter the Source URL (URL of the modern site), Target URL (URL of the classic root site), Archive URL (new URL for the classic root site). We have also added an example cmdlet below for your reference.
|
1 |
Invoke-SPOSiteSwap -SourceUrl https://contoso.sharepoint.com/sites/CommunicationSite -TargetUrl https://contoso.sharepoint.com -ArchiveUrl https://contoso.sharepoint.com/sites/NewSite |
This cmdlet will archive the classic root site at https://contoso.sharepoint.com to https://contoso.sharepoint.com/sites/NewSite and moves the modern root site at https://contoso.sharepoint.com/sites/CommunicationSite to https://contoso.sharepoint.com.
Note: The Archive URL should be unique. Make sure that there should be no existing sites or deleted sites in the Recycle Bin at the location where you are moving your classic root site.
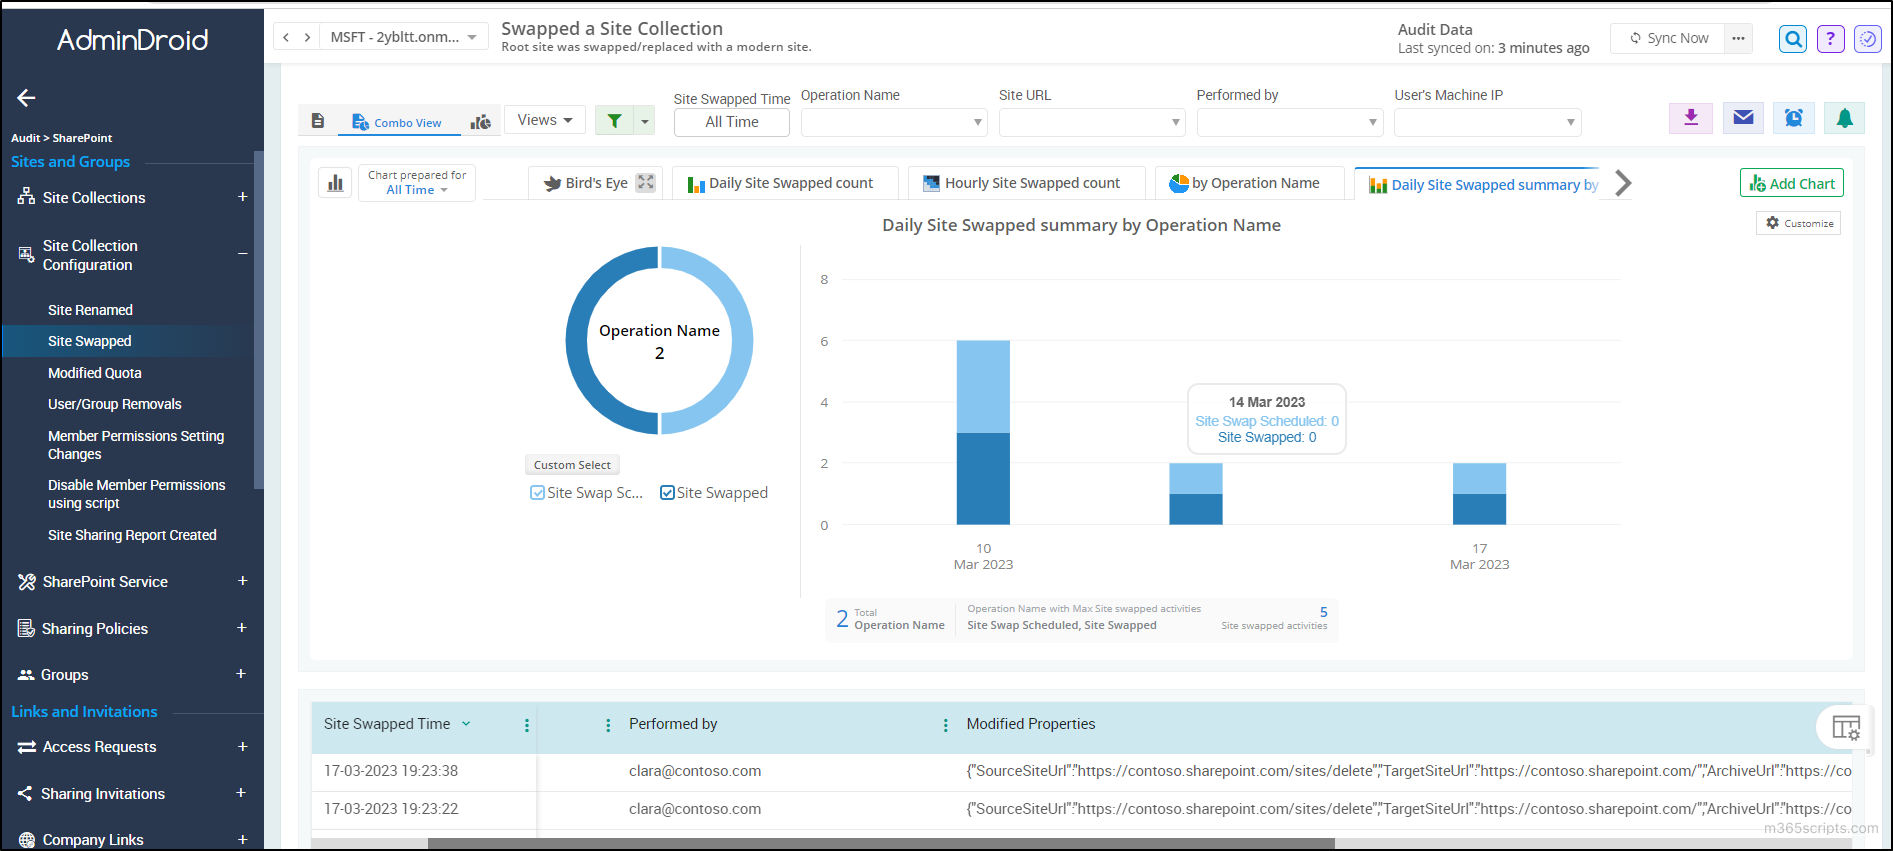
It is crucial to monitor SharePoint Online site swapping for a smooth transition of sites. However, both PowerShell and SharePoint admin center lacks insights about the modified properties, site-swapped timing, etc. No more worries! AdminDroid has got your back!
AdminDroid’s “Site Swapped” report gives you extensive metrics on SharePoint Online site swapping, including site swapped time, swapped site URL, user performed the site swap, modified properties, etc.
These insights will help you track site-swapped time, the new URL or domain associated with the swapped site, and more from a single report.
Added to the above, you can eliminate sensitive data leakage by monitoring all your SharePoint Online groups and site collections, site sharing permissions, SPO sharing policies, site upgrades, and more with AdminDroid’s SharePoint Online reporter.
Furthermore, AdminDroid allows you to audit SharePoint Online by giving far-reaching analytics of the SPO site collections, DLP policies, and SPO file activities, thereby catching up every activity happening in the Microsoft 365 organization.
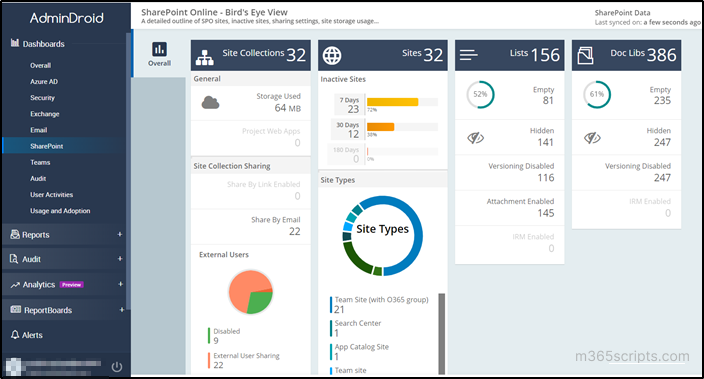
Don’t let yourself be ended with the above! For easy understanding of your entire SharePoint Online, AdminDroid’s SharePoint Online dashboard gives you metrics into site types, storage usage, inactive sites, and external users in an engaging way.
Get 180+ reports from AdminDroid for effective SharePoint Online management !
By the way, you can get enough reports on SharePoint Online with AdminDroid. But where will you go for insights to monitor all the Microsoft 365 resources? No need to go searching anywhere! Because AdminDroid itself gives you exclusive reports on Microsoft 365 resources, such as Azure AD, Exchange Online, SharePoint Online, etc., under a single roof.
Furthermore, AdminDroid provides you with 190+ free Azure AD reports on user login, password changes, admin role changes, and more.
Don’t delay! Explore the power of AdminDroid for proper governance of SharePoint Online!
In a nutshell, we have provided you ways to replace and manage your root site effectively. By replacing the default root site with a modernized site, you can enhance collaboration, increase productivity, and improve the user experience. Moreover, the ability to track usage of all SharePoint sites can further support these improvements by providing insights into site activity and engagement.
Thus, we hope this blog helps you to address any questions or concerns you may have had regarding the root site in SharePoint Online. Also, if you have any additional suggestions on replacing the root site, we encourage you to share them with us in the comments section.