
Create Transport Rules in Exchange Online Using the New-TransportRule Cmdlet
Transport rules in Exchange Online help manage email flow by applying actions to emails based on specific conditions. While these rules can be created through Exchange admin center, PowerShell provides a faster and more efficient way to manage them at scale. In this blog, you’ll learn how to create Exchange Online transport rules using PowerShell with practical examples.
In Microsoft 365, not every email should be treated the same way. Some messages may contain sensitive information that shouldn’t leave the organization. Others may require encryption, spam filtering, or additional review before delivery. Manually enforcing these requirements across thousands of emails is impractical.
Exchange Online makes this possible through Transport Rules, which automatically inspect messages and apply actions based on predefined conditions.
In this blog, we’ll explore how to create Exchange Online transport rules using PowerShell and walk through common mail flow scenarios.
A transport rule (also known as a mail flow rule) is a feature in Exchange Online that automatically processes email messages as they travel through your organization’s mail system. Instead of relying on users to manually follow email policies, transport rules help enforce those policies automatically.
It consists of three core components:
- Conditions: Define the criteria that determine when Exchange Online should apply the transport rule.
- Actions: Specify the action that Exchange Online should take when the configured conditions are met.
- Exceptions: Define the circumstances under which the transport rule should not be applied, even if the conditions are satisfied.
Organizations use transport rules to enforce security, compliance, and mail flow policies across their Microsoft 365 environment. Some common scenarios include:
- Adding disclaimers to outgoing emails.
- Blocking messages containing sensitive information.
- Redirecting emails to another mailbox.
- Encrypting confidential messages.
- Preventing emails from being sent to unauthorized recipients.
- Blocking risky attachment types.
Admins can create mail flow rules in Exchange Online through either the Exchange admin center or PowerShell. To create a mail flow rule from the Exchange admin center:
- Sign in to the Exchange admin center and navigate to Mail Flow → Rules.
- Click Add a rule → Create a new rule, then enter a unique name for the mail flow rule.
- Under Apply this rule if, configure the required condition(s) based on your business requirements.
- Under Do the following, select the action(s) that Exchange should perform when the configured conditions are met. If required, configure any exceptions to exclude specific messages from the rule, and then click Next.
- On the Set rule settings page, configure the Rule mode, Severity, Activation Date, and Expiration Date based on your requirements. Leave Match sender address in message set to Header, and then click Next.
- Review the rule settings and click Finish to create the mail flow rule.
While this approach is suitable for creating individual mail flow rules, it can become time-consuming when combining multiple conditions, maintaining large keyword or domain lists, or replicating configurations across environments.
Additionally, mail flow rules created in the Exchange admin center are disabled by default and must be enabled manually. This limitation can be overcome by creating transport rules using PowerShell.
The New-TransportRule cmdlet is used to create mail flow rules in Exchange Online. Unlike the Exchange admin center method, transport rules created using PowerShell are enabled by default. Here is a simple example of creating a transport rule to block .exe files using PowerShell:
|
1 2 3 4 |
New-TransportRule ` -Name "Block Executable Attachments" ` -AttachmentExtensionMatchesWords "exe" ` -RejectMessageReasonText "Executable attachments are not allowed." |
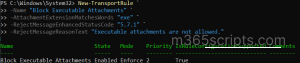
This script creates a mail flow rule that automatically blocks emails containing .exe file attachments and rejects them with a custom notification message.
Let’s look at some more advanced scenarios where admins can use PowerShell to efficiently create mail flow rules in Exchange Online:
- Block emails containing unacceptable words using mail flow rules
- Filter spam emails using mail flow rules
- Block emails with specific file types Using mail flow rules
- Allow only approved external domains to book meeting rooms
- Block emails from specific domains using mail flow rules
- Configure Multiple Mail Flow Actions in a Single Transport Rule
Organizations may need to prevent the use of inappropriate, offensive, or prohibited language in email communications. While the Exchange admin center works well for managing a small list of blocked words, PowerShell is more practical for handling large and frequently updated keyword lists.
To create a mail flow rule to block emails containing unacceptable words using PowerShell, follow the steps below.
- First, create a text file (for example, BlockedWords.csv) and add all unacceptable words or their common spelling variations.
- Then, connect to Exchange Online PowerShell and run the following script.
|
1 2 3 4 5 |
$BlockedWords = Import-Csv "<InputFilePath>" | Select-Object -ExpandProperty UnacceptableWord New-TransportRule ` -Name "Block Unacceptable Words" ` -SubjectOrBodyContainsWords $BlockedWords ` -RejectMessageReasonText "<RejectionReason>." |
Make sure to replace <InputFilePath> with the path and extension of your file, and <RejectionReason> with the desired rejection message.
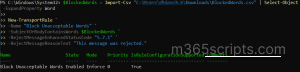
This script creates a mail flow rule that blocks emails containing keywords from the specified file.
Spam emails can increase the risk of users interacting with unwanted content. Mail flow rules can help identify messages containing common spam-related words and assign a higher spam confidence level.
To create a mail flow rule to filter spam email messages using PowerShell, run the below script:
- Before running the cmdlet, create a CSV file (for example, SpamWords.csv) and add all spam-related keywords.
|
1 2 3 4 5 6 7 |
$SpamKeywords = Import-Csv "<InputFilePath>" | Select-Object -ExpandProperty SpamWord New-TransportRule ` -Name "Filter Spam Emails" ` -SubjectOrBodyContainsWords $SpamKeywords ` -SetSCL <6 | 9> ` -Priority 0 ` -Comments "<Description>" |
Make sure to replace <InputFilePath> with the path and extension of your file, and <Description> with a meaningful description of the rule. You can modify the -SetSCL value based on how aggressively you want to classify messages as spam.
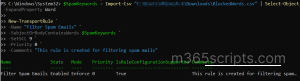
This script identifies messages containing the specified spam-related keywords and assigns a Spam Confidence Level (SCL) to help Exchange Online classify them as spam.
Certain file types such as executable or script files can introduce security risks into the organization. Mail flow rules can automatically block messages containing these attachments before they reach recipients.
To block messages that contain specific file extensions using a transport rule, run the following script:
|
1 |
New-TransportRule -Name "Block Specific File Types" -AttachmentExtensionMatchesWords <FileType> -RejectMessageReasonText "<ReasonText>" |
Make sure to replace <FileType> with the file extension you want to block (for example, exe, bat, js, or zip), and <ReasonText> with the rejection message that users will receive when the email is blocked.
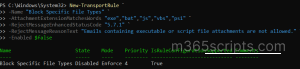
This script blocks emails containing the specified file extensions and returns a custom rejection message to the sender.
Organizations often need to restrict meeting room bookings to trusted partners or approved customers. Mail flow rules can prevent booking requests from unauthorized external domains while allowing approved domains to continue scheduling meetings.
To allow only approved external domains to book a meeting room using an Exchange Online transport rule, run the following script:
|
1 2 3 4 5 6 7 |
New-TransportRule -Name “External User Meeting Room Creation”` -SentTo <RoomMailBoxUPN(s)> ` -MessageTypeMatches "Calendaring" ` -FromScope "NotInOrganization" ` -RejectMessageEnhancedStatusCode "5.7.1" ` -RejectMessageReasonText "You are not allowed to make bookings in this room" ` -ExceptIfFromAddressMatchesPatterns <AcceptedExternalDomain(s)> |
Make sure to replace <RoomMailBoxUPN(s)> with the user principal name of the room mailbox or room mailboxes, and <AcceptedExternalDomain(s)> with the external domain names that should be allowed to book the meeting room.
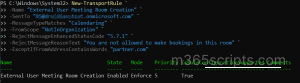
This script allows meeting room booking requests only from approved external domains and automatically rejects requests from all other external senders.
Organizations may need to block emails from untrusted, temporary, or unwanted domains to reduce spam and improve email security. Mail flow rules can automatically reject messages from these domains before they reach users.
To block incoming emails from specific domains, run the following Exchange Online transport rule script:
|
1 2 3 4 5 6 |
Domains = Get-Content " <FilePath>.txt" New-TransportRule ` -Name "Block Bulk Sender Domains" ` -FromAddressContainsWords $Domains ` -RejectMessageEnhancedStatusCode "5.7.1" ` -RejectMessageReasonText "Emails from this domain are not accepted." |
Make sure to replace <FilePath> with the path and extension of your file containing the domains to be blocked.
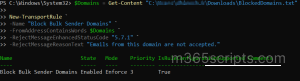
This script blocks emails originating from the specified domains while allowing messages from any configured exception domains.
Organizations often need to protect sensitive information shared through email, especially when messages are sent to external recipients. Instead of creating separate mail flow rules for encryption, auditing, and incident reporting, Exchange Online allows administrators to combine multiple conditions and actions into a single transport rule.
Using PowerShell, admins can quickly create advanced mail flow policies that automatically identify sensitive content, apply encryption, notify administrators, and track policy violations.
Use the script below to create a transport rule with multiple actions in Exchange Online using PowerShell.
|
1 2 3 4 5 6 7 8 9 10 11 12 |
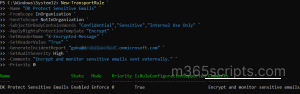
New-TransportRule ` -Name "Protect Sensitive Emails" ` -FromScope InOrganization ` -SentToScope NotInOrganization ` -SubjectOrBodyContainsWords "Confidential","Sensitive","Internal Use Only" ` -ApplyRightsProtectionTemplate "Encrypt" ` -SetHeaderName "X-Encrypted-Message" ` -SetHeaderValue "True" ` -GenerateIncidentReport "<AdminUPN>" ` -SetAuditSeverity High ` -Comments "<ProvideComments>." ` -Priority 0 |
Make sure to replace <AdminUPN> with the user principal namemof the administrator or compliance team member who should receive incident reports, and <ProvideComments> with a description that explains the purpose of the mail flow rule.
What This Rule Does
The above transport rule demonstrates how a single rule can perform multiple mail flow actions:
- Identifies emails sent from internal users to external recipients.
- Detects sensitive content containing keywords such as Confidential, Sensitive, and Internal Use Only.
- Encrypts emails to protect sensitive information from unauthorized access.
- Adds a custom message header (X-Encrypted-Message: True) to help identify and track encrypted messages.
- Generates an incident report for administrative review and compliance tracking.
- Assigns a High audit severity level to improve visibility during audits and investigations.
- Processes the rule with the highest priority before lower-priority mail flow rules.
- Includes an administrative comment to document the purpose of the rule.
After creating transport rules, admins may need to manage them. To do this, use the following cmdlets:
To retrieve all transport rules configured in your organization, run the below cmdlet:
|
1 |
Get-TransportRule |
This cmdlet returns all mail flow rules along with their configuration details.
To enable all disabled rules at once, run the below cmdlet:
|
1 |
Get-TransportRule | Where-Object {$_.State -eq "Disabled"} | Enable-TransportRule |
And that’s a wrap! The examples covered in this blog represent just a few of the many transport rule scenarios supported by Exchange Online. Based on your organization’s security, compliance, and operational requirements, you can create custom mail flow rules tailored to your needs.
We hope this blog has helped you understand how to create Exchange Online transport rules using PowerShell. Thanks for reading, and feel free to share your questions or experiences in the comments section.


