How to Track Emails with Office 365 Message Trace Using PowerShell
Message tracking or tracing helps admins to monitor mail flow and delivery status. With message trace, you can
- Analyze what happened to an email like whether it was received, rejected, deferred, or delivered at the other end.
- Troubleshoot email delivery problems.
- Validate email policies and mail flow rules
Message trace can be performed through the Exchange admin center (EAC) or PowerShell. Most admins prefer PowerShell over EAC. So, this blog provides detailed information on Exchange message tracking using PowerShell and solves the most needed use cases.
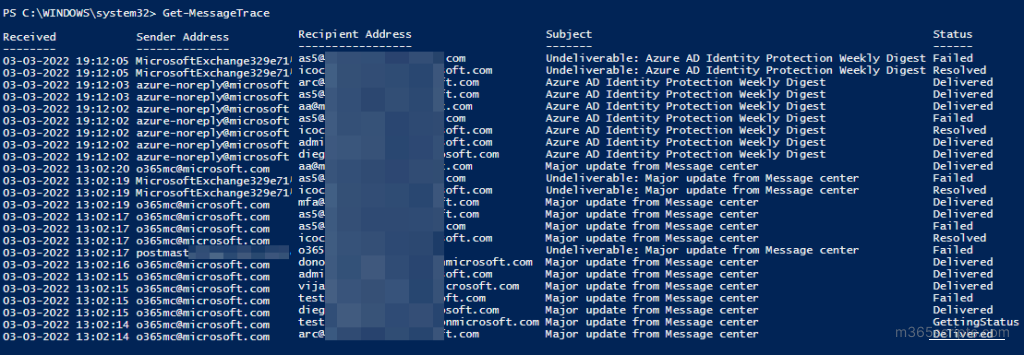
You can use PowerShell cmdlet Get-MessageTrace to trace messages have passed through your Microsoft 365 organization. You must connect to Exchange Online PowerShell before running the below cmdlet.
Get-MessageTrace
The cmdlet provides the following information.
- Sender address
- Recipient address
- Sent/received date
- Email subject
- Email delivery status
- Email size
- Source IP address (From IP)
- Message trace id, etc.

Note: Get-MessageTrace cmdlet retrieves email details only for the last 10 days. To track messages for the custom range, you can use the StartDate and EndDate property. If you do not specify the date range, it will retrieve only the past 48 hours’ data. To trace data older than 10 days, you can use the Start-HistoricalSearch cmdlet.
Our blog provides cmdlets/examples for the following use-cases that solve message tracing requirements.
- Get message trace details for custom range
- View specific properties of message tracing
- Get message trace by email subject
- Export message trace report to CSV file
- View message trace report in Grid view
- Get message trace details
- Extended message trace using PowerShell
- Get message trace for older than 90 days
To get message trace details for a specific period, run the cmdlet with StartDate and EndDate.
Get-MessageTrace –SenderAddress [email protected] -StartDate 2/25/2022 -EndDate 3/3/2022
The above example retrieves message trace details about emails sent by john from Feb 25, 2022, to Mar 3, 2022.
To view a few properties of message tracking info, you can run the cmdlet as follows.
Get-MessageTrace –RecipientAddress [email protected] -StartDate 2/25/2022 -EndDate 3/3/2022 | Select SenderAddress,Received,Subject,Status,Size,MessageTraceId
This cmdlet lists all the emails received by John between Feb 25, 2022, and Mar 3, 2022, along with the sender address, email received time, email subject, delivery status, size, and message trace id.
If you want to track the emails using the subject, you can use the given below.
Get-MessageTrace | Where {$_.Subject -like “*SampleText*”}
The cmdlet retrieves all the sent and received messages with the given subject in the last 48 hours.
You can download the message trace report by exporting the result to a CSV file. To export the report, you can use the Export-CSV cmdlet. For example,
Get-MessageTrace –SenderAddress [email protected] -StartDate 2/25/2022 -EndDate 3/3/2022 | Export-CSV ./MessageTraceReport.CSV
It will retrieve message trace details about John’s emails sent from Feb 25, 2022, to Mar 3, 2022, and export them to the CSV file called MessageTraceReport. By exporting message trace report, it is possible to find inactive distribution lists and other unused mailboxes in the organization.
Grid view will be helpful if you want to filter the report by recipient address, delivery status, etc. To view the message tracking report in grid view, you can execute the following PowerShell code.
Get-MessageTrace | Out-GridView
![]()
The Get-MessageTraceDetail cmdlet tracks all events of a specific email. This cmdlet retrieves details more quickly than the Get-MessageTrace cmdlet. But it requires a message trace id and recipient address of an email.
To get more details of an email, run the following cmdlet.
Get-MessageTraceDetail -MessageTraceId 4904d2c0-773c-4653-eb59-08d9fd1609b2 -RecipientAddress [email protected]

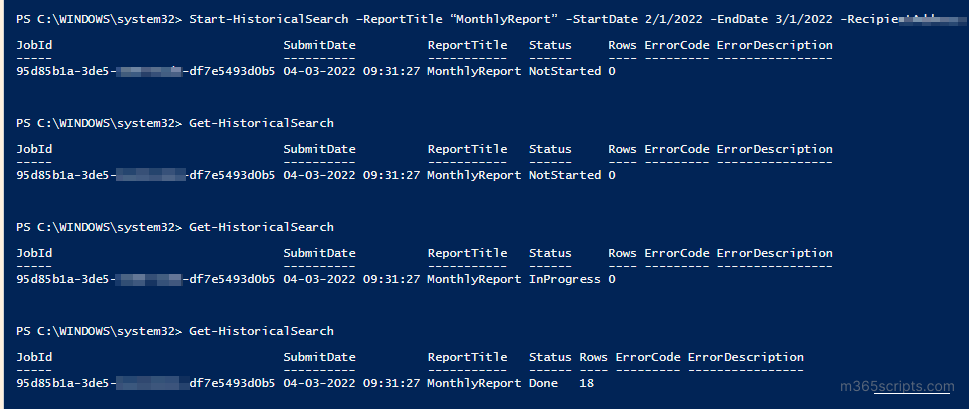
Since Get-MessageTrace allows you to retrieve the past 10 days’ email data, you can use the Start-HistoricalSearch cmdlet to view message trace details for the last 90 days.
To start a new historical search, you can use the cmdlet given below.
Start-HistoricalSearch –ReportTitle “John-MonthlyReport” -StartDate 2/1/2022 -EndDate 3/1/2022 -SenderAddress [email protected] -ReportType MessageTrace –NotifyAddress [email protected]
The cmdlet searches all the emails sent by John in Feb month and notifies Dave once the search is complete.
To view the list of historical searches performed in the last 10 days and their status, you can use the Get-HistoricalSearch cmdlet. An organization can do a maximum of 250 historical searches in 24 hours.

It is not possible to get a message trace for more than 90 days. You can perform an eDiscovery/Content search, but it will retrieve messages that are currently available in the given mailbox. However, you can use tools like the AdminDroid office 365 auditing tool to store and search message traces for an indefinite period.


